Quantcast
Channel: HTG
Viewing all 178 articles
Browse latest View live

Citrix User Group...AppSense support lifecycle changes...ThinApp support...other ramblings

$
0
0
Yesterday I was at the Citrix User Group in Newcastle, so a bit of a slight diversification today as I discuss some of the things highlighted there. One of the quandaries of running an AppSense-themed blog is that even though I want to do more coverage of products like Citrix, App-V, ThinApp and other supporting technologies, I always find myself trying not to alienate my core readership by moving too far away from the central focus. So I'm going to do a quick run-through of some of the things I heard here - but primarily look at them from an AppSense/user virtualization perspective, to try and keep everyone happy :-)

It was the first time I'd been to a Citrix User Group meeting and as it was being held in the frozen wastes of my homeland in the north-east I wasn't sure exactly how busy it might be, but the turnout and participation seemed to be quite good.

Unfortunately the goodness of the day wasn't extending onto me as, rather embarrassingly, I was supposed to be helping out Pete Jones of AppSense with his presentation - and awoke to a total hard drive failure on the desktop I had my content stored on, leaving poor Pete to try and rapidly patch up a hole in his plans (sorry Pete!) And naturally, I hadn't copied it into Google Drive or DropBox - despite being a heavy user of both. How much time do I spend lecturing people on best practices - and then I spectacularly avoid doing it myself! A classic case of practice what you preach coming to bite me. But then again, with some animation-related PowerPoint crashes and flaky wifi coverage plaguing the presenters who'd been sensible enough not to manage to lose their content, it looked like, as pointed out by @sideshowtob, that the demo gods were angry with everyone.

Anyway - enough of my failings, what did I find out?

Changes to AppSense support lifecycle

I will start with the main AppSense-related information, which is a notification of changes to their support lifecycle. AppSense have decided to stop perpetual support of all versions of their software (which is what they've done, historically), and simply provide support in a specific lifecycle. This has to be a good idea, really, because it will hopefully free up resources from supporting very old versions that could be better used elsewhere. All AppSense products will now be supported for three years after GA (General Availability), or 12 months after the release of the latest service pack, whichever is later.

There are more details on this announcement, upgrade documents, and an upgrade toolkit at https://www.myappsense.com/end-of-support-policy.aspx (requires login).

Essentially this means that all version 7 platforms and version 8.0 are effectively unsupported, and 8.1 would technically go out of support under this rule in January 2014. However, as this has just been announced, support for these versions has been extended to 1 July 2014 to allow time for upgrades of the older platforms. So, if you're on 7.x, 8.0 or 8.1, you have seven months or so to put together an upgrade plan. There are the aforementioned documents available on MyAppSense helping with upgrade plans, and I'm always available for hire if you need help (never had an upgrade fail yet!), and of course AppSense Professional Services can also provide this sort of function.

AppSense EM support for VMWare ThinApp

In case you hadn't noticed, AppSense now supports Personalization of VMWare ThinApp applications as well as technologies like App-V and Symantec WorkSpace Streaming. I know it also supports Citrix Streaming - but again, if you weren't aware, Citrix Streaming is being deprecated in XenDesktop 7 and up, and App-V is now the recommended application virtualization solution for Citrix platforms, so if you're using the legacy Citrix Streaming feature, you may have to start thinking about moving away from it.

I also recall getting a question on Twitter about whether Personalization in this case replaces the VMWare ThinApp "sandbox" feature, but couldn't remember who sent it to me :-( The answer is, as I suspected, yes - Personalization Server intercepts the writes to the VMWare sandbox and virtualizes them.

XenDesktop 7.1

It was interesting to hear the Citrix line that anyone looking to deploy the new, unified Citrix product, XenDesktop 7.x, should actively avoid using 7.0 and instead go straight to 7.1. What those people who've already deployed XenDesktop 7.0 will think of this is probably not something I could write here, but it's the usual case of early adopters taking the pain. I recall similar feelings around XenApp 6.0 and 6.5 but I'm quite certain that 6.5 was nowhere near as hot-on-the-heels of 6.0 as XenDesktop 7.1 is to 7.0, so maybe Citrix are trying to avoid too many people getting into the situation where they are stuck on a platform with issues.

For those who've been missing out on some of the differences in XenDesktop 7, there are several notable changes. Shadowing has been replaced by Remote Assistance. Storefront is being pushed as the replacement for the ageing (but reliable) Web Interface. Oracle database support has been dropped in favour of SQL alone. Smart Auditor is no longer there (which is a shame, I quite liked it). Session Pre-Launch has been discontinued. Power and Capacity Management has been replaced by (I think) SCCM. There's quite a theme of Citrix-specific features being replaced by Microsoft counterparts. Also, I was interested to hear that Citrix's own Single Sign-On is being deprecated in favour of a Citrix Ready solution provided by Imprivata. Maybe I just saw a poor implementation, but when I came across Imprivata's SSO solution I wasn't very impressed by it - it seemed to take forever just to unlock a machine.

All of these changes and replacements probably mean that XenApp 6.5 FP2 will continue to be used for quite some time. I can see the benefits of getting everyone onto the new FMA rather than the long-in-tooth IMA, but until some more features are available, I think the large-scale adoption might be slower than expected.

VDI and Windows

On a more long-term level, there was interesting discussion about the future of the Windows platform and VDI itself. I've heard people stating previously that Windows may only exist in the future as a platform for middleware and legacy applications, but it was intriguing to see how many people viewed VDI itself as a short-term solution for the next three to five years. Clearly, they expect the next wave of IT to move towards SAAS-based models as users have the same applications over multiple platforms, making the actual underlying operating system itself irrelevant. This would put the focus much more on managing the applications rather than the user ecosystem itself.

I wondered where this hypothetical future - let's remember, the IT industry is notoriously difficult to predict and has a habit of moving in unexpected directions - would leave the AppSense software suite? Well, MobileNow and DataNow clearly are aimed at this app-oriented future - it's DesktopNow that would probably need to adapt. Thinking of this made me wonder what happened to Project Acorn, the drive to put DesktopNow onto the OSX platform? If the future does turn out to be one in which the OS is irrelevant and VDI is maintained for middleware or legacy apps, then DesktopNow will have to adapt to platforms such as OSX, Android and iOS at least - maybe more. Environment Manager in particular is very Windows-centric, so I'd be interested in hearing what actually happend to Project Acorn.

XenMobile

There was a good presentation on the XenMobile side of Citrix, which they are pitching as an end-to-end solution for MDM/MAM. I've concentrated so much on XenApp and XenDesktop recently that I think I'd completely missed the XenMobile part, but now that I see what they've got it does look very interesting. The Worx applications certainly give it a scope missing in the (few!) other similar solutions I've seen, so there is a lot of potential there. Until I manage to see it in action and kick the metaphorical tyres, however, I will reserve my judgement.

That also set me wondering (probably because of the heavy ShareFile integration in XenMobile) whether AppSense and Citrix, traditionally complimentary technologies, are now competing against each other rather more than they used to? Certainly with MobileNow vs XenMobile and DataNow vs ShareFile, we have products on both sides chasing the same markets. Mostly I've seen AppSense and Citrix work together to produce great solutions, but it occurs to me that with the newer AppSense products, there may be a bit more clashing than collaborating in the marketplace.

Migrations

The final part of the session involved a lot of discussion around the particular challenges of XenDesktop migrations. I won't go into all of this stimulating discussion, but one thing that did stick in my memory was the mention of LakeSide Software's products as tools for getting an overview into the usage and scope of an enterprise's applications. That's certainly one of the main challenges I see - getting an organization to actually produce a correct and up-to-date list of the applications that are being used within their environment. Suffice it to say that far too many IT departments have no idea what their users are actually using.

I've normally tried to use AppSense Application Manager to do an inventory of user endpoints, but I don't find it the quickest tool to complete this task, not by a long way. I think I might give the LakeSide stuff a bash, as there are no extra costs associated with it and the reviews on their website look good.

Summary

Anyway, that's just a quick recap of some thoughts I had during the day's presentations and discussions. Suffice to say, I think we should all try and support our local community efforts wherever possible, be they organized by Citrix, AppSense, VMWare, Microsoft or others, because they are very useful events for all of us involved in the IT industry.

Installing AppSense DesktopNow configurations onto a persistent disk in a Citrix PVS environment

$
0
0
I’ve been doing a bit of work recently around trying to get AppSense configurations installed onto a persistent disk in a Citrix Provisioning Services environment. It actually isn’t as intimidating a prospect as I initially erroneously thought, so we will run through the process briefly in this blog post.

Citrix Provisioning Services is – or was – more or less the standard for streamed disk deployments in XenApp environments. However, there are some schools of opinion that believe once MCS (Machine Creation Services) is able to provision XenApp servers – which may well happen as XenApp and XenDesktop move closer together in the new versions – that PVS may well end up being deprecated somewhat. With this in mind, the work done here may turn out to be slightly redundant – but I am sure a vast quantity of those enterprises currently utilizing PVS will continue to do so for at least the next few years.

The systems I tested this on were VMWare guests running Windows Server 2008 R2 in a Citrix PVS 6.0 environment. The system drive was on the non-persistent C: partition, with the persistent drive sitting on the D: partition. On the D: drive were many of the things you’d normally expect to see on a persistent drive – log files, antivirus, monitoring tools (EdgeSight in this case), the App-V cache, and the pagefile.

Firstly, the reason behind wanting to maintain your configurations on a persistent drive – after all, don’t a lot of places have the configurations set to install automatically, at the very least on startup? This is indeed true – but if you recall my very first post, Computer Startup Actions aren’t processed unless the configuration is already installed on the endpoint when it starts up. This also means that every time you want to update a Computer Startup Action you will need to update the master or “gold” image – a non-trivial operation in most environments and one that requires strict change control. If you can’t use Computer Startup Actions because of this reason, this also means that you can’t apply Computer Group Policy Objects and take advantage of the breadth of Conditions that AppSense Environment Manager ships with natively.

Now, what we really need to know to get this started is where AppSense stores its configurations! Fortunately, this information and a bit more had already been kindly pointed out to me by Matt Murphy, Neil T, and a few other commenters and emailers, which saved me raising a support call :-) On Windows Vista / 2008 / 2008 R2 / Windows 7, the configuration is downloaded to the %systemdrive%\ProgramData\AppSense folder. The configuration is a .aamp, .aemp or .apmp file dependent on the part of the DesktopNow suite that you are using. On systems using XP / 2003, I believe the default location would be %Allusersprofile%\Application Data\AppSense - but I haven't tested this, so if you are doing this on an older platform, you will need to do a bit of research first.

Unfortunately the AppSense software seems to have a nasty tendency to expect this location to be hardcoded. Even if you install the agents onto the persistent drive (in this case D:), the configuration is still expected to be in the %systemdrive%\ProgramData location. Moving the %systemdrive% variable to a persistent drive would completely negate the entire point of using PVS in the first place, so we need to redirect it somehow.

After a bit of research and discussion, it becomes apparent that there is a Registry key sitting at HKLM\Software\Microsoft\Windows NT\CurrentVersion\ProfileList that controls the location of the ProgramData folder. However – it wouldn’t make sense to redirect the entire folder, when all we are trying to deal with is the AppSense configurations. I did initially try to redirect the entire folder using this Registry key and quite spectacularly stopped the App-V client from working (although after some Registry hacking and a re-registration of all the WMI components, it came back to life). There’s also the distinct possibility you may leave your Windows OS unable to be serviced (i.e. patched) by redirecting the entire folder, so just going for the AppSense part is probably the safest option!

What we can do to achieve this, and what I suspect many of you will have already thought of, is the possibility of using something like subst or a symbolic link to achieve this redirection. Indeed, the symbolic link (or junction point, depending on what you want to call it) looks like the most reasonable option.

Symbolic links are created using the mklink command from an elevated command prompt. Don’t forget that the target directory (the one you want to redirect) cannot exist when you run the command. In the experience I had here I find it would probably be best to do this redirection prior to installing AppSense software, as you can be sure the target folder does not exist and there will be no hidden gotchas – however, you may be able to do it post-install with a bit of jiggery-pokery.

First you need to make sure that your PVS system is in Private Mode, as there will be no point redirecting the folder if the change is just going to disappear at next restart!

Ensure that the %systemdrive%\ProgramData\AppSense folder does not exist, and then run the following command

mklink /J c:\ProgramData\AppSense d:\ProgramData\AppSense

(Naturally, substituting the appropriate drive letters for your persistent and non-persistent areas)
You should now see a junction point appear in the folder as below


Which when double-clicked, leads you neatly into the corresponding folder on the persistent drive.

Note– you don’t specifically need to redirect the entire AppSense folder. As only Environment Manager (at present) has Computer Startup Actions, you could get away with simply using a junction point from %systemdrive%\ProgramData\AppSense\Environment Manager. However, for posterity and future-proofing, I opted to do send all of the configurations to the persistent disk – deciding on the way you wish to do it is entirely your own decision.

So the next action would be to install your AppSense agents as normal. Originally I thought you might need to install these to the persistent drive also, but if you are going to be (as you should) putting the agents into the master/gold image, then it doesn’t matter whether they are on the system drive or not.

Next it will be time to run the Imaging and Provisioning Wizard as part of the XenApp Role Manager utility, to ensure that your system is nicely normalized. After you’ve done this and run whatever other pre-sealing tasks you normally conduct, then it is time to shut the system down and put your image back into Standard Mode.

While your system is restarting this would be a good time to fire up Environment Manager and create a configuration with a Computer Startup Action in it. For the purposes of this demonstration we will choose something simple – setting an Environment Variable called TEST.


Now, bring the PVS system back up. If, like most people, your configurations deploy at startup time, as soon as it connects up you will see it obtain the new configuration.

Let’s check for the existence of the TEST environment variable. It doesn’t exist. This is exactly what we expected – the PVS system came up without a configuration, the configuration was assigned, but the Startup Action didn’t run because the Computer Startup trigger had passed before the configuration was assigned.

We’ll take a quick look in the redirected folder which points to our persistent drive, and as you can see below, the configuration is located in the correct folder.


So the next thing to do is restart the system. As it is a PVS system, it should then return to the base image it had before it was sealed.

When it comes up, we again see it pick the assigned configuration up at startup…


…but this time, when we log in, what we see is this time our Computer Startup Action has successfully run, meaning that the configuration we assigned has persisted between restarts! Sweet!


This is great news – we can now utilize the full power of Computer Startup Actions in an environment like PVS without worrying about updating the gold image every time we make a change!


There is one caveat I have found regarding this, however. In some environments configurations are not deployed using the Management Console – they use System Center Configuration Manager or another deployment tool. When the PVS system starts up in this way, the AppSense software queries the MSI database to see what is installed, and then uses this information to report to the Management Console. If you’ve got the Installation Schedule for Configurations set to Disabled, this will mean that the PVS system will report the configuration(s) as Pending Install– even when they are in fact installed, and active to boot. In these situations, this can make your administration and reporting from the Management Console look a little screwy.

But even with this caveat – and those of you who use the Management Center and have the configurations set to install won’t have this problem – this still is a good, reliable way of getting around the issue of using Computer Startup Actions in an environment where the system drive is non-persistent.

Note– this process should work for other technologies similar to Citrix Provisioning Services, it isn’t specifically intended for PVS. Not sure whether MCS will eventually be able to provision XenApp systems as well as XenDesktop, but when or if it does, I hopefully will get around to trying it on there – everything else I will probably leave in the capable hands of the rest of you :-)

One final note– if you’re using PVS, then I’d recommend taking a look at this article regarding normalization, and this article regarding automating the normalization, just in case you hadn’t come across them already.

And now – I fancy a barbecue, seeing as though the British summer has officially arrived, and will henceforth be gone within 48 hours!

AppSense DesktopNow Environment Manager Computer Startup Actions querying Computer Group membership

$
0
0
One of the things that I like to do in my AppSense configurations is use an "Enabler" node at the top of each trigger. For instance, in the Logon trigger, the very first node queries an Active Directory group to see if the user is a member. If they are not a member, then processing is stopped. This is a very efficient way of ensuring that AppSense processing only occurs on the users that you want it to.

However, I also wanted to do the same thing in the Startup trigger, to ensure that only the correct devices process the AppSense configurations. Whilst this may seem a little pointless - after all, devices will only process the configuration if the agents are installed on the endpoint - what I was after was an easy way to "turn off" AppSense execution on the endpoint for troubleshooting purposes, without having to change Deployment Groups and/or remove or reinstall configurations. The best way I figured was to check for Computer Group membership at the start of the Startup trigger, and only process the configuration if the device was not in the "exemption" Active Directory Computer Group.

Unfortunately, I was a bit confused to find that the Computer Group Condition I set up simply didn't seem to work at all.


After a bit of thought an idea occurred to me as to why, perhaps, it wasn't working. When you set up a User Group Condition, you get the "LSA Supported" suffix on the Condition as shown below. This indicates that the security group membership has been "cached" locally, if you like, and there isn't a need for EM to query Active Directory to verify it. I guess it's kind of like using the user's security token - and it naturally saves valuable time.


Now, what I did notice, is that for the Computer Group Condition, there is no "LSA Supported" suffix.


Does this indicate that for a Computer Group query, EM has to contact Active Directory? If that's true, then it would tell us why the query isn't working...because in the Startup trigger, there's a good chance that the network hasn't initialized yet and the AD lookup can't be completed.

One quick call to AppSense support later, and confirmation is provided - a Computer Group Condition has to contact AD to complete successfully. Incidentally, the Site Membership and Computer OU Conditions suffer from exactly the same issue. This is a bit annoying - especially seeing as at every reboot, like a user, the computer will actually pick up and maintain a local security token that contains the details of the AD groups that the machine account is a member of. Apparently in future the functionality to query the computer security token (or similar) will be added to allow Computer Group Conditions to process without contacting a domain controller - but at the moment, we're looking for a workaround.

What utilities are there available that can tell us what groups a computer account is a member of without requiring network connectivity? Offhand, the one that sprung immediately to mind was gpresult. Can we call gpresult from within Environment Manager - preferably from PowerShell - and output the target group?

I must again make apologies for the rudimentary nature of my PowerShell skills - any suggestions for cleanup or optimization are gratefully accepted. But anyway...this is the PowerShell I came up with. Don't forget we are trying to check whether the machine is not a member of the specified Computer Group, so that's why the return code is 1 if the check for the group name succeeds.

# Query computer security token for specific group membership

$result = (GPRESULT /R /SCOPE COMPUTER | Select-String -pattern "App AppSense Device Exemption Group" -list).line

$result1 = $result -replace "        ",""

if($result1 -eq "App AppSense Device Exemption Group")
{
 exit 1
}
else
{
 exit 0
}


We have saved this as a Reusable Condition, so we can call it whenever we want. It appears to need to run as System to work correctly.

Now, there is a small problem with this. Users update their security tokens at logon time when they are authenticated by a DC. Machines update them at boot time, when they establish a connection to the domain controller. But we already know that the Startup trigger is processed before AD connectivity is available. If I was to add a machine to the exemption group in AD, and then restart it, the security token would still be showing the old group memberships. I would have to restart the system twice - once to pick up the new security token, and the second time to actually process it in the Startup trigger. This isn't very workable, so is there any way around this problem?

Well, there is an executable called klist.exe that is available on 2008 R2 and Windows 7 (and up, hopefully) that can actually refresh a system's tokens without rebooting. If you're intending to use earlier Windows server or client versions with this trick, you might need to pay attention to this article - http://sdmsoftware.com/general-stuff/picking-up-computer-group-membership-changes-without-a-reboot/. As we are working on a XenApp 6/Windows 7 platform, we can use this without any jiggery-pokery being required.

The key is to specify the logon ID so that the tokens for the System account are refreshed. We are going to call this as an Execute Action from the Shutdown trigger - so if a computer is added to a new AD Computer Group, when it begins to restart, it will refresh the tokens so that it is already updated by the time the Startup trigger is executed, and there will be no need to have AD connectivity.


The -li 0x3e7 switch specifies the System account. However, I'm wondering if the Run As tab in the Execute Action is set to System, whether this switch may be unnecessary and purge may be the only parameter that is required?

Anyway, once we've added this to the Shutdown trigger - hey presto! I added the computer account to the "exemption" group in AD, rebooted it once - and the AppSense configuration was not processed at all. Success!

There is one caveat to this, though - this isn't going to work on PVS systems. The computer security token will always be identical to the one present when the image was sealed - therefore with PVS (or similar) systems, there won't be any way to update it without contacting Active Directory. Even multiple restarts won't cut it, because it will reset to the master image at each reboot. I suppose you could try and redirect the security token onto a persistent drive - but I'm not going down that route, the possibilities for totally trashing the operating system seem way too likely!

But if you simply need to be able to query Computer Groups in the Startup trigger in a conventional environment (or maybe just on your physical endpoints, rather than SBC or VDI which may be using PVS images), this little trick should certainly allow you to do it.

Update #1 - thinking about it, you probably could do this on a PVS system, but it's an almighty fudge. You would have to set a User | Logon Action to query the Computer Group (using the native Condition, not the PowerShell we used here), and if successful, write some sort of flag file to the persistent disk. But obviously the problem is that if the membership was changed you would have to restart the system and then also get a user to log in, before the change was reflected in your flag file. This is probably hopelessly inefficient for the purpose I had here.

Update #2 - as pointed out by fellow ACA Aaron Parker, this highlights the fact that Environment Manager is, in current guise, primarily a USER environment management tool rather than device management. I totally agree - and whilst I would love to see EM positioned a bit better as a device management tool, because the Conditions give it so much power - right at this moment, there are better ways you can achieve management of your device environment. Hopefully it may change in the future!

Reading AppSense DesktopNow Environment Manager debug logs using the EMDebug LogParser tool

$
0
0
Recently I was in discussions with an AppSense TRM regarding a lot of niggly issues being seen in a particular client environment. One of the issues I had a bit of concern over was the amount of time spent logging and responding to individual support cases for each of these issues. Now I'm not denigrating the quality of support - the AppSense guys have always been helpful and accommodating - just making a point about the amount of time I was spending troubleshooting what, in some cases, turned out to be fairly minor issues. I engaged the TRM to try and find if there was any way I could do a bit of troubleshooting myself based around the AppSense Environment Manager debug logs.

I'm assuming those of you who are familiar with AppSense DesktopNow will have come across a situation where you've needed to turn on debug logging (discussed in this post - which might need a bit of updating, seeing as though it is from quite a while ago). The usual process is to send them off to AppSense support for perusal - but if, like I was, you find yourself trying to quickly troubleshoot a whole load of POC issues, then it might make more sense time-wise to try and interpret some of the logs yourself.

The tool that AppSense have recently released for help with reading debug logs is the EMDebug Log Parser Tool. I'm told there was a predecessor to this tool that was much less intuitive, but it's something I never found the opportunity to use. The EMDebug Log Parser has an associated library file that needs to sit in the path, but it doesn't need any installation besides this - the best way to run it, IMO, is to bung it on a network share and execute it as necessary.

Firstly - this won't work unless your EM environment is at least version 8.1, but the last 8.0 I saw was a good while ago so I'm hoping there isn't too much of that left out in the wild.

Secondly - you clearly will need some EM Debug Logs to work with! The collection of the logs was covered in an earlier post, but there's a nifty little trick the TRM showed me to turn on EM Debug Logging from within persinfo.exe, which seems easier and quicker than the traditional method.

If you've got the latest version of PersInfo running - and if you're troubleshooting an issue, chances are that you might be running it - you simply need to right-click on the icon in the notification area and select the Advanced | EM Logging | Enable option. The interface to enable it is slightly different to that you may be familiar with from the EM Debug Tool (shown below)...


...but it should still be fairly easy to configure. You will be prompted to restart the services afterwards after which the debug should be active. If you're using the latest version of persinfo, you will see a handy notification in the system tray warning you that the debug is now running, and that this may impact system performance.


So now we need to generate some logs by actually logging on to the machine as an AppSense-enabled user. Once we've logged in (and back out, if we're looking to capture information from the logoff process as well as the logon), it makes sense to stop the debugging in the same way that you started it, to make sure we aren't subjecting our system to an unnecessary load. Then we can browse to the folder where we saved our logs and see what has been captured.


The logs are named according for the specific EM area they refer to, the session ID, and the process ID. It should be fairly straightforward to identify the one you will need to pay attention to. In this case, we are going to investigate the EMUser log from Session 5, which we know will show us the logon actions for the session I just initiated. The configuration it was running was extremely simple, verifying a username and then trying to map a drive which didn't actually exist.


Straight away we can see the Log Parser tool gives us a lovely, colour-coded intuitive view of the log file, which is much easier to read than browsing the text file directly (don't believe me? Give it a try) Right at the top we can see the single Condition in our node, a check for the username. Clicking on the event so it is highlighted provides us with some more detail in the bottom panes of the Log Parser window


It's easy enough to see that the check for the user's username has passed successfully, so naturally then the next thing it tries to do is map a drive in the dependent Action. The colour-coding alone tells us that this Action has failed (as we intended it to), but we will have a look at the extra details to see if we can see any clue as to why it failed.


We can clearly see here the error returned of "operation returned because the timeout period expired". So even if it wasn't already obvious, it should now be clear that the Map Drive Action timed out trying to connect to the network path specified - because it didn't actually exist.

After this you will see an event that logs the successful completion of the Node (even though an Action failed, the node still completed). Don't forget that if a Node doesn't complete successfully it should time out according to the default settings.

The last set of log entries refer to processes starting within the user session. These are logged to see if they match a Process Started Action. Obviously there weren't any configured in our simple test configuration, so nothing else is logged subsequent to these.

So now you should be able to save an Environment Manager debug log and quickly peruse it yourself to see if anything is failing for a particular reason.

Another handy part of the EM Log Parser tool is the Timeline view on the View menu. This shows you a breakdown of the actions over a period of time, and should be very handy in identifying Actions that slow down the user's logon.


What you should look for in a good logon is a more-or-less vertical line, as shown above. Significant delays will spread the timeline view out horizontally and hopefully pinpoint any potential bottlenecks in your configuration.

The EM Log Parser tool also comes with a handy Filter function that will be familiar to anyone who has used Process Monitor at all, which is particularly useful in breaking down large and/or complex logs to target the specific area you are interested in. For instance, if I wasn't interested in Process Started Actions, I could quite simply filter them out from the Table view.


Finally, there is also a Personalization view that specifically deals with the Personalization Server aspects of a user session, and that provides information similar to that which can be gleaned from the excellent PersInfo tool.

Well, hopefully this little run-through should allow you to troubleshoot EM Debug Logs yourself to identify simple issues. Please remember, though, that if you're in any doubt about how to resolve or approach an issue highlighted by this you should really contact AppSense support for some help, especially when working on live production environments.

Thanks to Andrew Silver of AppSense for giving me a run-through of this handy tool.

Folder Actions in AppSense DesktopNow Environment Manager - Copy, Mirror and Synchronize

$
0
0
Environment Manager can do all sorts of useful things. However if, like me, you've worked with the software for a long time, sometimes you tend to forget about useful new features that have been added in during the 8.x years. One of these I tend to overlook is the capability to Synchronize and Mirror Folders.

The uses cases for Synchronize and Mirror are fairly broad. They can be used for manipulating files and folders for certain applications, for assisting with migrations, for copying existing user data into Personalization Server, for doing on-demand backups to removable drives - the uses of these Actions are only limited by what you can think of, to be fair.

One situation I always thought would be a good use of these Conditions would be for simple Offline Files functionality (thanks to Ben Whitmore for originally putting the idea in my head). Now, I know that this could be construed as a bit pointless, because AppSense have a product - DataNow - which does precisely this for you. However, I am going to persist with this idea as a demonstration for a few reasons - 1) to see if it can be done in this fashion, so that you can do (admittedly very simple) offline sync'ing without ponying up for the DataNow license, and 2) to give a quick overview of using these Actions, even if you use them for something completely different.

On a sidenote, I've been meaning to do a post on using DataNow for folder synchronization for some time - as soon as I get my home lab sorted out I will, because all of the people I work for seem more keen on ShareFile for some reason, probably because they get it with their Citrix licenses.

Differences between Folder Actions

A quick bit of background. Essentially, what's the difference between Copy, Synchronize and Mirror as defined in AppSense Environment Manager?

Copying a folder simply copies the contents of a folder from one destination to another, regardless of the other files or folders present in the destination. This Action has an "Only copy new or changed files" checkbox, which allows you to restrict the scope of the copy to files modified since the last time it was run. Note that this applies to source and destination - if a change is found in a source file or a destination file, a copy from source to destination will be initiated.


You also have a lot of other configurable options available such as File/Folder Conditions (see below), File Extension Exclusions and Path Exclusions.


Mirroring

The Mirror Action creates an exact copy of a folder or folder structure and all the files in it at the destination folder. The main difference in using Mirror is that files already existing in the destination are overwritten from the source, and any supplementary files in the destination are deleted. This makes the Mirror Action most useful for the type of functionality we are demonstrating, as it handles deletions in the way that we want.


The Mirror Action doesn't have any of the associated Conditions and Exclusions that the Copy Action does, as you'd expect.

Sychronizing

The Synchronize Action examines the specified folders and combines the contents of both to produce a file and folder structure which is identical in both locations. If two files the same are encountered, the most recently modified one is copied to both locations.


Worth noting here is the Delete behaviour. If a folder or file is removed from either source or destination, it will be copied back next time the Synchronize occurs. Regardless of the source folder, the file will always be synchronized, never deleted.

The method we will use in our example will be the Mirror Action, as this gives us the capability to effectively reflect a file or folder being deleted.

Triggering

The main problem with this is how to trigger the Action. To efficiently replicate the functionality of something like Offline Files, there would need to be a new Trigger, one for File/Folder Contents Changed. This sort of trigger is the way DropBox, ShareFile, Google Drive, SkyDrive and all the other third-party apps out there function (at least I presume it is). You could possibly replicate this with some fancy manipulation of Scheduled Tasks - but this seems to be unwieldy, especially for a small demonstration like this. Add to this that I don't know how efficiently EM handles file and folder conflicts, and the fact that AppSense actually have a separate product handling this functionality - DataNow - and you can tell that it's unlikely that a File/Folder Contents Changed trigger will ever materialize.

But let's not forget we're just trying to do some very basic file sync'ing here, not put up a serious challenge to technologies like DataNow and DropBox :-) So we will opt to trigger this at Logon, Logoff and additionally, at Session Locked/Unlocked. Sometimes people wonder what the Session Locked/Unlocked triggers are good for - and this is one of those situations. Usually, people lock their sessions because they are about to take a break and won't be interacting with the desktop for a while - and this is a perfect time to do things that might take time or resources, like Mirror Actions. Aaron Parker wrote a blog post on caching App-V packages at Session Locked - another good use of the Trigger.

Initial setup

Let's quickly put down some markers as to our (hypothetical) use case to ensure we don't get out of scope.

We are going to imagine we have some users who log on to laptops (remotely and locally) and also maybe use a workstation or thin client when in the office. The idea is, if they are on their laptop they will have their home folder available locally to the device (so that they can access it when they are off the corporate network), and it will synchronize with the remote location when connected to the corporate network. Also, if they log in to a workstation, they will access the remote networked copy of their home drive. Folder Redirection Actions will be used to define the home folder on a per-device basis (see below).


Note - the laptop chassis type is identified using the method specified in this previous post.

The reason I called the folder MyDocs as opposed to something like "Documents" is because of my limited PowerShell skills, I needed to give it a name that users were unlikely to apply to another folder. Anyone who's any good at PowerShell can probably get around this by binning my code and using their own :-)

So, when our users log on to their laptops, they will receive a local copy of My Documents, whereas if they use an office desktop machine, they will have a networked copy of My Documents.

The heavy lifting

Now we need to configure things so that a laptop user's local My Documents synchronizes with the remote My Documents when connected to the corporate network. We will configure the Actions and Conditions as a Reusable Node as we will call it several times within our configuration.

First up is a check to see if we are online with the corporate network or not. There are various ways you can achieve this - various Wait For Network scripts are out there (one is detailed in this article), and there's also the check for the netlogon folder that was detailed in this article.

We also need to ensure that the user is running from a laptop, so we will reuse the laptop chassis type Condition described earlier by ANDing it with the corporate network check.


If both of these Conditions are satisfied, we now need to detect which folder - either the remote or the local copy - was updated last. Now, Environment Manager allows you to specify Last Modified Time on the Folder Exists Condition, but sadly it doesn't allow you to compare this with another folder. So to get what we want we will have to do this via PowerShell. We are going to use an If Else Group to hold this (as there will be different Actions dependent on the output of our Condition). Add Condition | Flow Control | If Condition and select Custom from the Conditions available within.


Now, we need to insert the PowerShell code to do the comparison of the two folders. You will have to change the paths to match your environment, obviously.

$username=$env:username
$localsource= $env:userprofile
$localsourcedate=Get-ChildItem -Include MyDocs -Recurse -Path $localsource | Sort-Object LastWriteTime -Descending | Select-Object -First 1 | Get-Date -Format yyyyMMddhhmmssF
$remotesource="\\FileServer\UserShares\$username"
$remotesourcedate=Get-ChildItem -Include MyDocs -Recurse -Path $remotesource | Sort-Object LastWriteTime -Descending | Select-Object -First 1 | Get-Date -Format yyyyMMddhhmmssF

IF ($localsourcedate-ge$remotesourcedate)
{
 exit 0
}
ELSE
{
 exit 1
}


Also note that we have used Get-ChildItem with the -Include MyDocs switch. The reason this is done this (seemingly roundabout) way is because Get-ChildItem does not return the properties of the parent folder. Therefore, our two base variables $localsource and $remotesource actually point to the folder above the one we are enumerating, and the -Include switch makes sure we only work on the one subfolder we are concerned with. As I said earlier, this is a fudge to cover my rudimentary PS skills - you could probably easily get around it using Get-Item in conjunction with Get-ChildItem.

The format we've used is intended to simply give us an easy comparison between the two. The various formats available are covered here.

Finally, as this compares the Last Modified time I'm not sure whether you would need to ensure that the NtfsDisableLastAccessUpdate Registry value is set to 0. I am in a PVS environment where I can't change the vDisks with impunity so apologies for not testing this thoroughly. If you are in doubt, though, change the HKLM\SYSTEM\CurrentControlSet\Control\FileSystemNtfsDisableLastAccessUpdate value to a DWORD of 0. Alternatively, if you don't like messing with the Registry directly, you can use the command

fsutil behavior set disablelastaccess 0

which should do it as well.

The Mirror Folder Actions

Next we simply need to configure the Mirror Actions. If the local copy is the newest, we will Mirror the local copy to the network.


If the local copy is not the newest (and by implication, the remote copy is), we will Mirror the network copy to the local.


This should leave your entire node looking something like this


Finally, you need to link your Reusable Node in the appropriate places. We are going to do it at Logon, Logoff,Session Locked and Session Unlocked.


Now's the time to try it out. Give it a test, and you should find you have some rudimentary file synchronization set up between local and remote! Of course, it's not by any means completely robust - I can easily think of particular situations in which it may fail - but for a cheap and cheerful way to get maybe a small number of laptops running a file sync, it's an interesting option.

Summary

Of course there are better ways to do this, you could even do this with things like robocopy. But if you're in the habit of using the likes of robocopy, and you also use AppSense EM, then why have to maintain separate scripts? Leverage the full power of EM and keep everything simpler.

As I said, though, this was just intended to introduce you to the power of Mirroring and Synchronizing from within EM, rather than to demonstrate a use case. At a particular client I have seen the support department using the Mirror Action to do on-demand backups of a problematic locally-installed app onto a removable drive. When the user is finished using the software, and if the local drive is plugged in and available, it copies all of the data onto the removable device. There are lots of ways you can get value-add from these Actions - hopefully this article will encourage you to try and use them a bit more!

It's Christmas - some festive tips and tricks for AppSense administrators

$
0
0
Christmas is here again...it seems to come around much faster these days. Maybe it's because I'm getting older. It's not going to be too much longer now before I have to edit my bio page to stop describing myself as "thirty-something" - how depressing :-)

Anyways, in the spirit of the season of goodwill to all men (and women), let's quickly compile a short list of little tips and tricks to give you AppSense administrators out there something nice for the holidays! These are just a quick list of things that I have in my notes that don't justify posts in themselves - hope some of them are useful to you.

1.  Sort out your Active Directory

AppSense sits almost at the top of the stack, when it comes to your combination of technologies. So like Citrix, it tends to be hyper-sensitive to sub-optimal configuration of lower-level technologies - like Active Directory. Think of how many lookups you do that depend on AD - I can guarantee it will be a large number. If your AD isn't performing, then how on earth do you expect AppSense to run well?

Fortunately Carl Webster did a great presentation on how to optimize your AD for use with XenApp and XenDesktop, and a lot of the points he makes are equally applicable to AppSense infrastructure. You can download Webster's presentation here, or alternatively watch him delivering it in full (in his Tennessee drawl).

2.  Do a review of your use of Stop If Fails

Stop If Fails doesn't really do what it says on the tin. Really, a better definition of it would be "do not execute child nodes if this Condition fails". You can find nodes that won't execute because of Stop If Fails - even if you want them to.

Richard Thompson and Gary McAllister both did blog posts describing this behaviour. Read their respective posts here and here to get a fuller understanding of how it works, and review your use of it.

3.  Configure your enterprise auditing correctly

I will do a fuller blog post on this subject soon (together with some archiving and cleanup scripts), but ensuring that your auditing is sorted out correctly is a surefire way to avoid some pain. Recently, I was working on an AppSense implementation where the license had expired, and it was a good couple of days before I actually realized that the reason Personalization wasn't working was because of this. If the auditing had been configured correctly, I would have seen the alert for it and saved myself some time.

Configuring audit events to forward to event logs and/or other alerting mechanisms can also ensure that you have good visibility of the health of the AppSense infrastructure.

4.  Use the available GPO for Personalization Servers

I still see a lot of environments where, in the absence of load balancing solutions, the Sites List in Personalization Server is still being used for providing failover. Since 8.3 of EM you've had the option to do this via a GPO instead, which is in my opinion a much more robust way of providing this functionality. You can filter the policy at the GPO level or even deploy it through EM Policy itself, giving a lot more control over how you provide Personalization Server failover lists.

The following (stolen!) diagram illustrates how the policy fits in with the processing order


The following options should be used with the GPO

The following options should be used:-

Specify list of personalization servers - Specify a list of personalization servers for endpoints to connect to and use as a failover list. The AEMP configuration server list is overridden by the list created.

Select Enabled and enter the required server name(s). Each server must be preceded by http://, and where more than one server is required, separated by a comma. For example, http://appsense1,http://appsense2

Bypass server site processing - Normally, initial contact is made with the server listed in the AEMP file. Once contact is made, the database rules are evaluated to determine which server the client should connect to. Enabling this option means clients ignore the database site rules and connect directly to the server determined by Group Policy.

Select
Enabled to bypass server site processing.

5.  Disable unneeded agents

I've also lost track of the amount of deployments I've seen where, for instance, the customer has all three agents deployed to their endpoints - but they're only making use of Environment Manager. If you don't have a configuration deployed for some of the agents, and you're not intending to do so in the near future, then it would make sense to remove - or at the very least disable - the unused agent involved. This can only make the performance of your endpoints better!

On the flip side, be careful when disabling other system services so that you don't affect AppSense. I once saw an environment where all the laptops had RDS disabled, and AppSense really seemed to struggle in that configuration.

6.  Self-Heal for networked files

Not being able to self-heal files stored on the network has been a bit of a pain occasionally for me with some applications. You may think that because this limitation is listed in the EM Console itself, there isn't a way around it, but there is.


The problem is simply permissions-related - the Self Heal Action runs as SYSTEM and therefore doesn't have network access. In order to get around this, you can add computer accounts to the ACL for the network share (and files) you wish to self-heal. You can use the Domain Computers group, a custom Computer Group, or simply individual accounts if that suffices.

7.  Automation in the Server Configuration Utility

I touched on this briefly in a previous post, but since AppSense released Management Center 8 FR 5 you can now manipulate the SCU through PowerShell. This is handy for those of you cloning, provisioning or requiring automation around the back-end servers. It is covered in detail in the Management Center 8 FR 5 Scripting Guide (may require login).

8.  Avoid Trusted Ownership issues in Application Manager

When you configure the list of Trusted Owners in Application Manager, be aware that nesting does not apply. So, for instance, if user joe.bloggs is a member of the BUILTIN\Administrators group, and the BUILTIN\Administrators group is listed as a Trusted Owner, this does not automatically confer Trusted Owner status to joe.bloggs. Therefore any files explicitly owned by joe.bloggs will not be allowed to execute, and Rules Analyzer will detect a Trusted Owner violation.

You must add each Trusted Owner explicitly to the list that you wish to configure.

9.  Disable Data Collection where it is no longer necessary

The Data Collection feature of Personalization Server is very handy. But I've seen a lot of  instances recently where it has been left turned on once the application discovery phase is finished. Data Collection puts an overhead on your Personalization database performance, so if you're not using it any more, turn it off! You can always turn it back on when needed, or better still, use a separate Personalization Group.

10.  A little Christmas gift

It wouldn't be Christmas without a little gift of some sort - so here (courtesy of Aaron Parker, who originally passed this across to me last year - thanks Aaron) is a list of Windows profile locations to help you out with Personalization. It's by no means comprehensive, but it should prove useful in some situations. Here's the link:-


So, that's it from me until after Christmas (although as I am on holiday, I will no doubt be putting out some material between Christmas and New Year, in order to avoid the streams of relatives). Hope some of these little tips are useful to some of you out there in your quest to better support your AppSense users!

Merry Christmas!

AppSense Performance Manager 8 FR 2 released

$
0
0
Happy New Year all!

Just a quick one today. Over on the AppSense blog, the release of AppSense Performance Manager 8 FR 2 has been announced. Us Twitter-zens are informed by AppSense's marketing bod Gareth Kitson that the software should be available for download on MyAppSense at approximately 4pm UK time today (15 January).

It's about a year (I think) since Performance Manager 8.1 was released, and many of you will know that PM doesn't tend to get updated very often. Neither does it tend to change very much when it does get an update - normally minor functionality changes or bug fixes is all the Performance Manager software is entitled to, poor mite.

Well, today they've actually done something groundbreaking and released 8 FR 2 with template configurations. Yes, how overdue are these! I know you've had the Best Practices guide and my own article I did on Performance Manager setup to guide you in the interim, but it's long overdue to be in the software itself. I am reliably informed that it comes with configurations optimized for General Purpose, Physical Desktop, RDS and VDI. Excellent stuff!

On top of that, Performance Manager now joins the rest of the suite by being able to save configurations directly into SCCM. So not one but two functionality additions for poor old PM. It won't know what to do with itself. :-)

You can read the official AppSense blog on this at http://blog.appsense.com/2014/01/appsense-performance-manager-8-2-release/. Here's hoping that your Performance Manager instances will now be optimized to the full the world over!

Look out for some more in-depth articles coming soon, I've been a bit busy over the last few weeks getting started as a writer over at The Virtualization Practice (http://thevirtualizationpractice.com/), but I will be back to my regular haunt with some content very soon!

AppSense DesktopNow Enterprise Auditing settings

$
0
0
I still look at lots of AppSense implementations and see the Enterprise Auditing for the Deployment Groups set to the defaults. The defaults are useful - if you'd like to know whether you're using an old configuration or there isn't a configuration applied. All joking aside, in the default configuration you're not going to see much useful. I've lost track of the amount of AppSense admins who tell me "well there wasn't anything in the logs" - that's because you haven't set anything up!

How DesktopNow logs events

AppSense DesktopNow can log centralized or locally. If you're using the Management Center, it would make more sense to log centrally. If you're not, then it makes more sense to log locally and then send these events up to a central monitoring system (SCOM,for instance). You configure local logging in the configuration itself - Tools | Auditing for EM, and Home | Auditing for AM and PM.

In this post, we're just concerned with setting your auditing to a helpful level. We will cover the local logging and log shipping in a separate post (hopefully very soon, because I need to do this for someone). Whether you centralize through Management Center or a third-party tool is entirely dictated by your own preferences, budget and choices.

In the Management Center, you can see both Events and Alerts on a Deployment Group basis. It's important to understand the relationship between Events and Alerts.
  • Events are generated by the settings under the Enterprise Auditing tab on the Deployment Group
  • The Events generated then trigger Alerts based on the Alert Rules under Alerts | Alert Rules
The upshot of this is, if you don't configure the Enterprise Auditing to audit the required Events, the Alert Rules won't be triggered as the Events don't exist to trigger the enabled Alerts. A bit confusing? Yes. Effectively, a whole host of useful Alert Rules are on by default, but because the corresponding Enterprise Auditing isn't on by default, then you don't ever get the Alerts that are pre-configured. At least that's the way I've always managed to interpret it, please someone correct me if I am wrong.

Events or Alerts and Events?

In my environments, I generally disable all of the Alert Rules and simply use the Events tab under the Deployment Group to see "what's going on". The only real benefit Alerts give you, in my experience, is a consolidated view for multiple Deployment Groups. Alerts don't auto-resolve (even if the trigger Condition is rectified, rather annoyingly), so if you're using them, you will have to go in and Resolve or Delete them all on a regular basis. Compared to dedicated monitoring systems like SCOM, the Alerts in the Management Center are really quite rudimentary, which is why I just prefer to look through the Events for information that I need.

Deciding whether to use Alerts or just Events is entirely your choice. The Alerts section does allow you to configure SNMP or SMTP responses to Events, which can be handy, so you may want to consider this in your decision. You can also do very basic severity levels (Critical, Low and High being your available choices). If you do decide to simply use Events,I generally Disable the Alert Rules rather than Delete them, as you can then always re-enable them as required. Setting up an Alert Rule again isn't rocket science, but you have to look up the event id.

Disabling an Alert Rule

What to audit

Again, this depends entirely on your environment, your needs, and your preferences. Some events have to be balanced against what value they provide and how much noise they will generate. What I've got listed here is just a basic baseline configuration for people who want to have something better than the default but aren't quite clear yet about their specific requirements. I'm sure everyone has their own events they like to audit!

You configure this on a per-Deployment Group basis, from the Settings | Enterprise Auditing tab.


Application Manager

9000 - Prohibited execution request (probably one of the most important ones)
9004 - Application limit denial
9005 - Time limit denial
9016 - The file's ownership could not be changed
9023 - Self-Elevation request
9099 - Application Manager is not licensed (again, important one!)

Environment Manager

9399 - Environment Manager is not licensed (important)
9406 - A user logon action failed to complete successfully
9408 - A user logoff action failed to complete successfully
9410 - A computer startup action failed to complete successfully
9421 - A user session reconnect action failed to complete successfully
9423 - A user session disconnect action failed to complete successfully
9425 - A user session locked action failed to complete successfully
9427 - A user session unlocked action failed to complete successfully
9429 - A process started action failed to complete successfully
9431 - A process stopped action failed to complete successfully
9433 - A network connected action failed to complete successfully
9435 - A network disconnected action failed to complete successfully
9652 - Personalization settings for a managed application failed to load
9653 - Personalization settings for a managed application failed to save
9660 - Personalization for a managed application failed
9661 - A timeout occurred whilst trying to communicate with the Personalization Server

Management Center

9702 - An agent or configuration was created or deleted
9703 - A user was created, modified or deleted
9740 - A security role was created, modified or deleted

Additionally, some people choose to monitor the various events for EM/PM/AM Agent restarted unexpectedly. I don't usually turn this on as there is generally service monitoring available, but should it not be, you might want to consider these events also.

Performance Manager

9199 - Performance Manager is not licensed (important)

If you're concerned about the effects of clamping and thresholds, you should configure additional events to audit here.

User Personalization Manager

9600 - Personalization Server failed to connect to the Personalization Database


This baseline set of events to audit should hopefully provide you with a better overview of what is going on in your AppSense DesktopNow environment. Over time, you can tune it to your specific requirements. As I mentioned before, you need to balance the value of alerts versus the amount of data that will be generated.

In a near-future post I will discuss how to log locally and archive the events to a central, third-party system.

Two years of being an AppSense bigot

$
0
0
Wow....it's been two years now since I put my first post out. (I only remember because it's my dad's birthday on the same day, I don't sit around and wait for the anniversary!) Lots of things have happened in that time, but it's still a bit of a buzz to get people reading my articles (over 250,000 page hits and counting), commenting on them, and asking me for help and advice. Thanks all!

In the virtualization arena as a whole, lots of things seem to be happening. We have DaaS predicted to be rising soon, powered by VMware, Amazon, and maybe Microsoft and Citrix too. Windows XP support comes to a shuddering end in a couple of months' time (as I sit here writing on a Windows XP VDI session), and that will mean accelerated migration programs from a lot of people. XenApp has returned from its rebirth as XenDesktop App Edition back to the old name, and become the longest-lasting Citrix technology name in history. I'm trying to get to grips with the new features of App-V 5, whilst looking at the features of new technology from Atlantis, RES, and a host of other companies, finding ways to fit other useful bits of software into projects like Spoon - all in all there seems to be a lot of exciting stuff going on tech-wise.

I'm happy to say I'm still finding lots of use for AppSense's suites of products - although more and more I hear talk of people looking more closely at Citrix and Microsoft tech, in particular, to do similar sorts of things. This seems unusual when a lot of people had predicted a difficult year for Microsoft in particular, but in the enterprise their offerings seem strong, and familiar, to many techies. I think that maybe AppSense might need to consider offering either newer features, or maybe even some discount in cost (perhaps for foregoing the Personalization Server option?) in order to remain competitive with the broadening of offerings from the big players. However, I have heard some interesting things recently (which I'm not allowed to blog about yet, unfortunately) which may indicate there are some good developments from AppSense on the horizon. Suffice to say I will let you know as soon as I can.

I've been working on some interesting articles around AppSense which I hoped to put out today, but given that I am waiting for some feedback from some SQL developers regarding parts of them, I've had to leave them in draft format for the moment and put out this quick diatribe instead :-( However this may be a quick chance for some shameless self-promo. I'm currently doing a bit of journalistic work for The Virtualization Practice (http://thevirtualizationpractice.com), so if you fancy reading my non-AppSense ramblings somewhere, take a dodge over to the website and look up my contributions - http://www.virtualizationpractice.com/author/jrankin/. There are a lot of other excellent authors writing there too, so make sure to have a look about at all of the material, not just mine!

Anyway thanks for reading my  blog again for another year, and for all the queries via the blog, email, Twitter, and Google+ - I do enjoy engaging with people all across the world and helping with their problems. Here's hoping I can actually broaden my scope of subjects this year, because I promised to do it last year, and failed rather miserably. :-)

Cheers,


JR

How to modify the location of the APPSENSEVIRTUAL folder

$
0
0
The AppSenseVirtual folder is used by Personalization Server to write file and Registry changes locally, before committing them to the Personalization Server database as required. The time of commitment will depend on when the application exits, whether it is part of an application group, and whether Offline Mode or Offline Resiliency is in action. This folder normally sits at %systemdrive%\AppSenseVirtual, and for most cases it will function quite happily in the default location. However, there may be instances - and I am thinking that these instances will be limited, it's not a standard enhancement - where performance could be increased by moving the folder to another drive.

Disclaimers 

AppSense will probably spit feathers when they see I've done a post on this, because they will be concerned about possible screw-ups, so let's make their concerns unfounded, by taking note. You should NOT deploy this unless your monitoring indicates that you may see some benefit from this, or that problems are occurring because of the default location (for instance, I have seen instances of over-provisioning in this area in PVS environments). If you do decide to go for it, I would recommend standing up a separate database to test first (not just a test Deployment Group, Personalization Group or Personalization Server - a completely separate test database). If you do it on a production database, make ABSOLUTELY SURE that you have a functional backup of your database before proceeding. I am told that this method is supported, but if you make the changes without due diligence then I am going to assume neither AppSense support nor myself are going to help you out of the hole you've idiotically dug yourself into without significant reimbursement. As always - test thoroughly before starting down this road and make sure you follow backup and change control processes. You have been warned.

Well, now that's all out of the way we can crack on :-)

Changing the folder location

The image below shows the folder in its default location on the system drive. The folder is hidden, so you will have to enable the correct options to see it.


Strangely - and this is the reason for the vehemence of all the preceding disclaimers - the location of this AppSenseVirtual folder is controlled by an entry in the database, rather than anything in the consoles itself.

This raises another important point. Effectively, the location of the folder is set on a per-database basis. If you want one set of users to have it in one location and one set of users to have it in another, then on a base level you're talking two different Personalization databases to achieve this.

I did think you may be able to get around this by using a system environment variable, but SQL won't recognize a Windows environment variable - either server or client side - as far as I am aware. You'd probably have to do some fancy jiggery-pokery with stored procedures to effect this, and as AppSense would doubtless not support that sort of configuration, we can forget about customizing it. So if you want to move the AppSenseVirtual folder, it is a setting hard-coded for all users of that particular Personalization database.

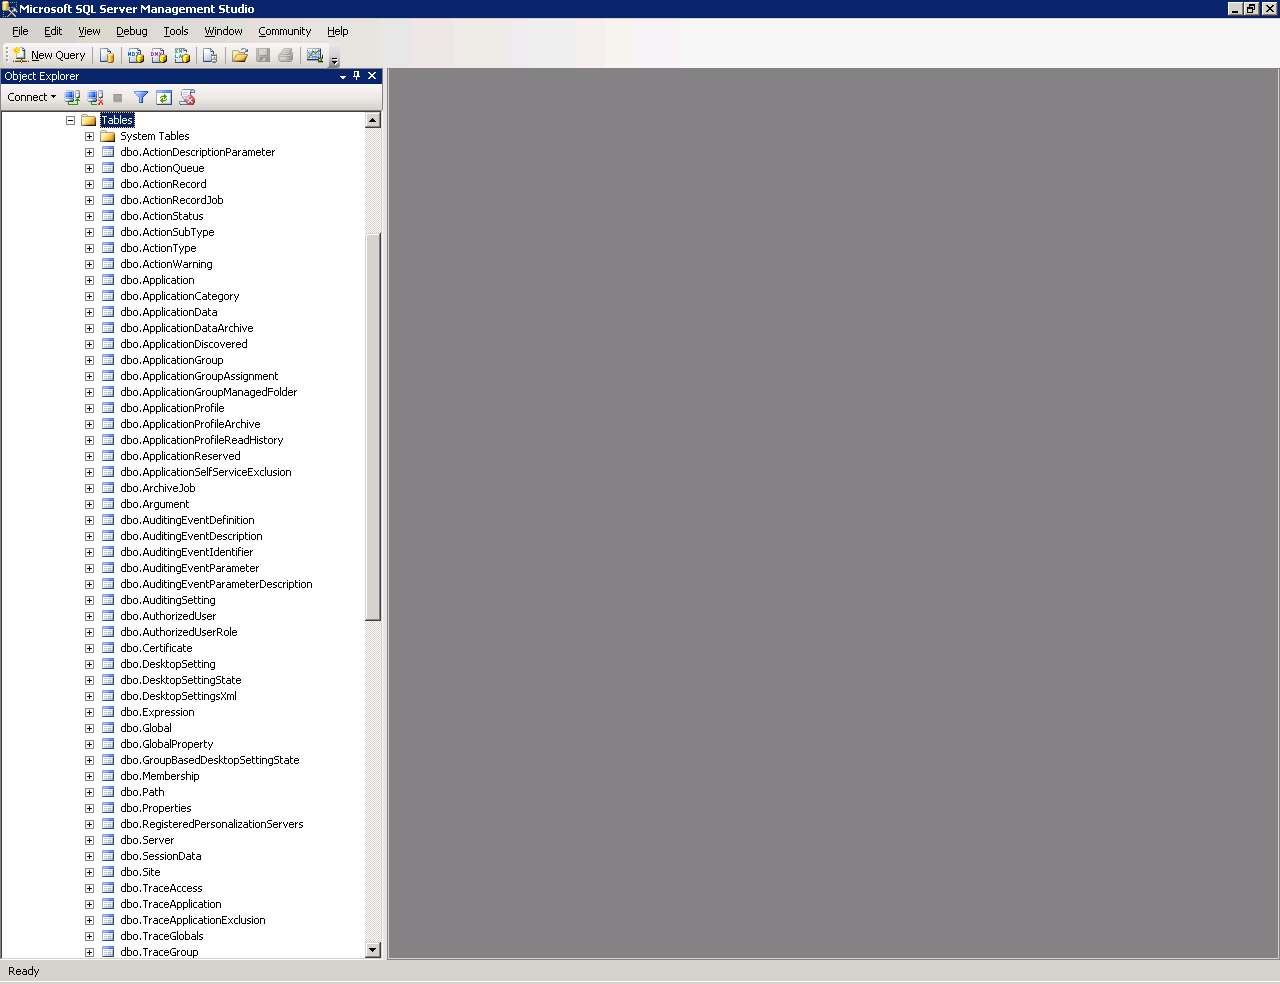
The table is the Global table, and the Property is RootFolder. You will need to log on to the SQL instance that your Personalization Server database is running in, and open up SQL Management Studio (or your tool of choice) - not forgetting to Run As Admin

Expand the Databases node under your instance, and expand the Personalization Server database (obviously the name may vary). Then expand the Tables section in the database.


Now, right-click the Global table (dbo.Global) and choose the Edit Top 200 Rows function


You will see data like this. The property we are interested in is highlighted


Now, we will have to be very careful about the value we put in here, because if it doesn't exist on the endpoint, Personalization will simply fail to work at all. PersInfo will show an error of "configuration not found" or similar. So make sure that the area you are pointing it to exists!

We are going to move it to a persistent drive, which in this particular case is located on Z:


Once you've changed the value, clicking on a different cell will commit the change straight away, so make sure you've done it correctly.

Verification

Now, we will log on as a test user after we have made the change. You don't need to create the folder in the redirected location (as long as the actual parent folder or drive exists), it will be created for you. The image below shows us the redirected location.


Running PersInfo shows us everything synchronizing as normal


so it appears that the change we made has been successful!

Reversing the process

The reversal process is simple - change the RootFolder database property back to %AppSenseProfileDirRoot%\AppSenseVirtual, and then log users back out and back in again. You will need to delete the new directory created (which in this example would have been Z:\AppSenseVirtual) to completely clean up after yourself.

Summary

Be very careful changing this - never lose sight of the fact that it is on a database level. As hinted at by the table name that you access, this is a global change and will affect all users of AppSense, so if you redirect the folder location to Z: and your laptop users have an X: drive instead, then you're killing Personalization for that entire subset of users. Completely.

But if you do find that there is a performance gain or configuration advantage to be had from altering this for your environment, this is the way to do it. Hopefully this should help anyone who ever has the need to do it.

Changing the Windows 8.x default logon screen image in AppSense Environment Manager

$
0
0
For today's instalment of AppSense-y goodness, I'm going to quickly run through how I used AppSense EM to change the Windows 8 startup screen image - not that you particularly need EM to do this, it just happened to be the tool I used.
 
The Windows 8 startup screen

Like a few other features of Windows 8, the logon/lock screen that you get by default sucks. Is it supposed to be the Seattle Space Needle? It's hardly globally recognisable or awe-inspiring, to be fair.


Windows 8.1 gives you a different one - but again, hardly takes the breath away.


Now I've got some great wallpapers on my machine that I got from Ryan Bliss (@dblasphemy) over at Digital Blasphemy, I think I'd much rather have one of these as my startup image and lock screen image. With all due deference and credit to Ryan for reproducing his work (I did pay for a subscription), do you think something like this would look better?


Well, I definitely do, so let's waste no more time and start digging to see if we can change it.

Lock screen or logon screen?

You can change the lock screen by using a GPO, but this doesn't affect the logon screen as well. If you're interested in doing it this way, the computer must have the following update applied - KB2770917, Windows 8 and Server 2012 Cumulative Update Nov 2012. Then, you should be able to alter the following policy object - Computer Config | Admin Templates | Control Panel | Personalization | Force a specific default lock screen image

The Registry key which this GPO writes its data to is located at HKLM\SOFTWARE\Policies\Microsoft\Windows\Personalization\LockScreenImage

However, if, like me, you're wanting to change the initial logon screen too, then you need to dig a bit deeper. I decided to perform these actions through Environment Manager, but you can easily do them any way you want - through Group Policy, a script, a golden image, any one of a number of ways.

The nitty-gritty

1. Take ownership of %systemdrive%\ProgramData\Microsoft\Windows\SystemData, to the SYSTEM account

I've used the builtin takeown command for this - just don't forget to run it as SYSTEM (which should be default if you're putting this in a Computer Startup trigger like me


2. Replace permissions on this folder, giving SYSTEM Full Control and enabling inheritance.


I did a post some time ago that discussed changing filesystem permissions using Environment Manager, we're using the icacls.exe route rather than PowerShell (as today legacy binaries feel like more fun)

3. Repeat the take ownership process, only this time we are giving ownership to the BUILTIN\Users group. We will need to use subinacl.exe for this, as takeown.exe can't change ownership to other specified groups (download subinacl here if required). This permission will revert after a restart - we just need to get it set for this part to work.


4. And we also, as above, need to give the BUILTIN\Users group Modify permissions, and again enabling inheritance


These Actions should all be nested nicely together as so

 
The tricky nitty-gritty
 
Now it's time for the tricky bits! In the folder C:\ProgramData\Microsoft\Windows\SystemData\S-1-5-18\ReadOnly\LockScreen_Z you will (now be able to) see the current image shown.
 
 
The fiddly bit is, the name of the file differs from system to system (it appears to append the resolution to the end). What we need to do is create a new file with the same name as the old one shown, replacing it with our new image. Hmmm...
 
(Yeah, OK, it's straightforward with a bit of PowerShell!) This assumes that, as usual, there's only the one file in that folder, though - if you've done anything like create a backup subfolder or extra files you will need to parse the output for the correct file to replace
 
$filename =Get-ChildItem C:\ProgramData\Microsoft\Windows\SystemData\S-1-5-18\ReadOnly\LockScreen_Z -Name
Remove-Item C:\ProgramData\Microsoft\Windows\SystemData\S-1-5-18\ReadOnly\LockScreen_Z\$filename
Copy-Item c:\Temp_Pics\NewLockScreenImage.jpg C:\ProgramData\Microsoft\Windows\SystemData\S-1-5-18\ReadOnly\LockScreen_Z\$filename
 
Now, we need to save this as a Custom Action and nest it under the preceding Actions
 
 
There's one more file copy to do - we also need to replace the file %systemdrive%\windows\web\screen\img100.png with our new image. As this is a static filename (thankfully!), a standard EM Copy Action will suffice. And yes, even though our source file is a jpg, we are renaming it to a png file.
 
 
Testing
 
Next we need to test. Obviously, the savvy amongst you will have noticed I am using a source file on the local drive. If you're wanting to distribute a file from a network location, you will need to do some additional work to get this up and running properly.
 
You may need to restart twice to see the logon screen in its glory, as EM will run the file copy at startup and by that time the logon screen may already be displayed. But if you lock the machine (or simply log out after the first restart), you should see your new funky logon screen background in all its radiant glory! Here's what I have now for mine....
 
 
(Yes, Ryan Bliss is an amazing artist, check out his website at www.digitalblasphemy.com)
 
So that's how we can use DesktopNow Environment Manager to change those awfully average default Windows 8.x logon and lock screens. As I said before, you can do this using many other methods - but the process will need to be much the same (rather convoluted) procedure.
 
One thing I didn't test was what happens when you change the screen resolution or add more monitors, so if you're putting this out in an enterprise environment, you may want to add an extra couple of layers to your testing. I'm fairly sure that the changes should stick (MS would cop some awful stick if images reset every time you changed the resolution), but it always pays to make sure.
 

Identifying wired or wireless connection types using AppSense DesktopNow Environment Manager

$
0
0
Recently I came across an Environment Manager configuration where different printers were required depending on whether a user was connected to the wired or wireless networks in an office. At first, the only way to tell seemed to be querying the client IP address(es) and matching them against wired or wireless subnets, but this didn't sit too well with me. Normally, when I solve an issue, I prefer it to be modular, so that it can be reused without having to reinvent the wheel, so I set to thinking about how to solve it in a slightly different way.

Client IP addresses

First a quick note about client IP addresses. This is a little bit tangential, but I thought it would be useful to share the information I found out during the course of dealing with this issue. As some computers (usually laptops) have both wired and wireless adapters, I wondered if AppSense Environment Manager would be smart enough to query both addresses, or would it simply take the first one assigned?

Luckily, it looks like EM is clever enough to deal with multiple IP addresses. After a little bit of testing involving assigning additional IP addresses (and a bit of help from Richard Thompson, as I originally couldn't find a network cable), we saw that if you made Actions specifically dependent on exact IP addresses, they were all processed successfully.

Finding another way

But, as mentioned earlier, this method (of checking IP subnets directly) would render the method completely self-contained for the particular customer, and make it a pretty dreary exercise for whoever copped the job of setting up all the subnet Conditions! So I thought it might be interesting to try and find another way to achieve this.

Querying network connection status

In Windows 8 and 8.1 you get the wonderful native Get-NetAdapter cmdlet, which I will endeavour to move to as time goes by (see screenshot below). However, as most enterprises are primarily concentrated on Windows 7/2008 R2 at present, I had to try and find an alternative method that I could call from PowerShell (because, if you hadn't noticed by now, PowerShell is the answer to everything!)


Prior to the dawn of PowerShell, Windows admins grew to love the netsh command. This is what I am going to use to achieve this, despite the fact that going by Microsoft's attitude, the command could be killed at any moment


When we can actually use these cmdlets directly from older PowerShell platforms it will definitely be the way to go (yes, I know there are ways to use these commands prior to Windows 8, but I'm trying to keep things simple here). Until then, we are going to make do by calling netsh from PowerShell directly.

Identifying the network connection

Digging around in netsh output - specifically, the command netsh interface ipv4 show interfaces - shows us a few interesting things...

The wired connection tends to be shown as "Local Area Connection" on all (or most) platforms. Occasionally it additionally shows as "Ethernet" (not sure whether this is a Windows 8.x thing or not)

The wireless connection shows as "Wireless Network Connection" on Windows 7/2008 R2 and earlier, and as "Wifi" on Windows 8/2012 and later.

We're very aware that a laptop can also be connected to multiple networks, so for this particular issue we're going to make a decision to implement a variable called "primary connection type".

If the user is connected to wired and wireless networks, the primary connection type will be identified as "wired".

If the user is connected to wired or wireless networks, the primary connection type will be set to whichever is connected (or not set at all, in the event the user isn't connected to any networks).

You could also leverage other Conditions (like checks to see if you are connected to the corporate network - see here or here for some more info on these) to further enhance this, but in the interests of simplicity we will stick to what we have already defined.

More simplistic PowerShell

Yes, as I keep saying my PowerShell skills are rubbish (born from necessity rather than training), but they seem to work, so if you can tidy up my code please feel free!

Needless to say this routine is best put together in a Reusable Node, as you may need to re-evaluate the connection status as a user disconnects networks, locks and unlocks their machine, runs certain executables (VPNs etc.) and logs off or on.

The first Action will be a Custom Action to query the status of the wired connection

$data = netsh interface ipv4 show interfaces | Select-String"Local area connection"
$split = $data -split '[ ]+'
$split1 = $split[4]
[Environment]::SetEnvironmentVariable("ConnectionTypeWired",$split1, "Machine")

As we've done previously, we've used the .Net Framework SetEnvironmentVariable method to make this persistent in the session - note that this time we've used a Machine variable, rather than a User one. Don't forget that you may need to run each of the Custom Actions as SYSTEM rather than the user to ensure that they can correctly set the machine environment variable - this seems to be rather hit-and-miss as to whether it is actually a requirement during my testing. As they say, your mileage may vary.

We will then add a couple of Conditions OR'ed together to check whether the OS is Windows 8 or Server 2012, because the script will have to be slightly different to check for the wireless connection in these later OSes


And then do the same for Windows 7/2008 (or any combination of OS Condition queries to define what is necessary for your environment)


For Windows 8 or 2012, the script in the Custom Action nested underneath it will look like this...

$data = netsh interface ipv4 show interfaces | Select-String"Wifi"
$split = $data -split '[ ]+'
$split1 = $split[4]
[Environment]::SetEnvironmentVariable("ConnectionTypeWireless",$split1, "Machine")

and for earlier versions, it should look like this...

$data = netsh interface ipv4 show interfaces | Select-String"Wireless"
$split = $data -split '[ ]+'
$split1 = $split[4]
[Environment]::SetEnvironmentVariable("ConnectionTypeWireless",$split1, "Machine")

This should leave your entire node structure for this Reusable Node looking like so


So now we have a Reusable Node that assesses which network connections are there (based on the OS), and sets a system environment variable showing the status of the Wired and Wireless connections it finds. The variable will actually contain the precise info on the connection state, so you will have a variable for either (or both) of these connections containing one of the following states:-

Disconnected
Connecting
Connected
Disconnecting
Hardware not present
Hardware disabled
Hardware malfunction
Media disconnected
Authenticating
Authentication succeeded
Authentication failed
Invalid address
Credentials required

This information could allow you to do some more work on identifying network adapter states and manipulating them, but I will leave that to you if you require it. We will simply concentrate on whether or not the variable shows as "connected". The savvy among you may also note that as I am using a space as a delimiter in my scripts, you will have to tidy up the -split function if you want to utilize this more detailed information. Yes, I did tell you my PowerShell was cheap and cheerful!

There is also another caveat to these quick-and-dirty scripts - if the machine you're testing (and I'm assuming 99.9% of the use case for this will be for laptops) has multiple physical NICs or wireless adapters, you are going to have to do some more advanced parsing of the netsh output, otherwise the variable will be defined by the status of the last matching adapter in the list.

Identifying the primary connection

So now we simply need to put together another Reusable Node that takes the info from the two environment variables we have set and decides what to set for our final environment variable, the one for PrimaryConnectionType.

This is a good case for an If Else group with an extra Else If (how's that for confusing?) Rather than run through each Action, it's easier to see how they sit together with a single screenshot showing the entire group Action


Now we will have (or not have) another environment variable declaring whether we have a PrimaryConnectionType or not. So it's now dead easy to set up some Reusable Conditions telling us whether the user is using wired, wireless, or neither.

To tell whether the user's primary connection is wired...


if it is wireless...


or if it isn't in a connected state for either.


Summary

This is a fairly simple example of what you can do with this. As I mentioned before, if your endpoints (or servers even, you may have users that roam between hosted and physical sessions) have multiple physical NICs or wireless adapters, then you will need to put a bit of work in on expanding the detection slightly.

If you do use something like this, then you'll also have to re-evaluate the network connection status from time to time. There are various triggers mentioned earlier that you can consider for this, but as always, testing is key to a successful implementation.

One final note. The AppSense grapevine is awash with rumours regarding new features coming in the next version of Environment Manager, EM 8 FR 5. If one of these turns out to be a Condition checking for network connection types, I will be somewhat unamused :-) 

I've also included the configuration I created during this article for download, should you wish to save some copy and pasting time! 

A handy hint for troubleshooting PowerShell Actions in AppSense DesktopNow Environment Manager

$
0
0
Verifying that scripts have run successfully in any software is often tricky. AppSense EM is no different. As it has such a powerful integrated scripting capability, you often find yourself doing lots of things with PowerShell and the like. During your test phase, it is often tricky to identify whether a script has run successfully, and even trickier to find the errors if it doesn't.

Of course, you shouldn't use PowerShell or other Custom Actions if a native Action will suffice. Scripted actions can often cause logon or application delays, particularly if they're complicated. So if it's possible, try and keep the scripted stuff to a minimum. It should only be used where the native Actions can't cut it - I've seen lots of cases where AppSense admins have used scripted rules for no other reason than "because we can", and they're probably making their configurations run slightly less than optimally because of this.

Anyway - the situation I found myself in, which was trying to verify whether a scripted Action had run successfully or not, felt somewhat similar to the good old batch days. I used to use the "pause" command in batch files to allow me to verify whether a script had executed successfully or not during the test phase. For instance, say I was running this batch command

md c:\JRR

(which naturally you all know is creating a folder)

I would insert the pause command afterwards, like so

md c:\JRR
pause

So, if the command ran successfully, I would see this at logon


However, if it didn't, I would see the error....like this...


....which tells me handily that the folder already exists. So, for my test phase, the pause command is invaluable. Obviously when we go to production stage, the pause command is removed, and the batch commands are then invisible to the end user.

In AppSense EM, I am primarily working with PowerShell custom Actions. How can we replicate this functionality within the PowerShell we are using?

Firstly, we will create the PowerShell. It makes sense to replicate the function we were using in the batch command above - creating a folder. Now I know I said that you shouldn't use Custom Actions where native Actions would suffice, and if I wasn't trying to demonstrate something, then yes, you should use Action | File and Folder | Create Folder instead!

The PowerShell we need to put in is

New-Item c:\JRR -itemtype directory

Now, there is one more thing we need to do to allow this to run in full view for the test phase, and this is to turn off the EM option for "prevent this script from running interactively", as below


Now we will need to add in the PowerShell command equivalent to wait for the user to press a key. If you simply wanted a pop-up box like the VB MsgBox function, you can - in fact we've used this in a previous article. However, calling out to another window seems a little clunky, so is there a way it can be done natively in PowerShell?

Yes, you can, by using the code below

Write-Host
Write-Host"Press any key to continue ..."


$x = $host.UI.RawUI.ReadKey("NoEcho,IncludeKeyDown")
Write-Host


This actually uses PowerShell’s automatic variable $host (which is actually an instance of the .NET Framework class System.Management.Automation.Host) and the ReadKey method. The ReadKey method enables us to get information about the key that has just been pressed. As we're only interested in the fact that a key has been pressed (and not what it is), two parameters are passed. NoEcho - this prevents any information from appearing on screen when the user presses a key, and IncludeKeyDown - this tells the script to continue as soon as a key has been pressed. If you want the script to wait until the user releases the key, use IncludeKeyUp instead. There is a last parameter you could invoke - AllowCtrlC, which would make the script continue during a Ctrl-C keystroke rather than terminating.

So, now we can save this into our configuration, and let's see what transpires.

If the command completes successfully, we see this


And if it doesn't complete successfully, we see this


And once our testing phase is over, we can reset the "prevent script from running interactively" option and comment out the "Press any key to continue" lines from the Action, and our users will not see any of this appear, successful or not.

One caveat to this. If you're using a version of EM prior to 8 FR 4 SP3, you may see this error when the script executes - you'll have to be quick to spot it though!


There is an AppSense technote explaining this behaviour - https://www.myappsense.com/Knowledgebase/TN-150888.aspx (may require login). The solution is to upgrade EM to the latest available version.

Hopefully this little trick may help some of you out there perform your testing in a more hassle-free manner. I've certainly found it valuable for troubleshooting scripted PowerShell Actions - although I have no doubt there are many more ways to skin this particular cat, such as logging to a text file or the console.

Deploying per-user file type associations in a shared-session Windows environment

$
0
0
Today's subject sits a tad off the AppSense track, but it's still very relevant to all of you out there with modern Windows-based computing environments. I get asked this question quite a lot when I'm consulting or doing project work. How can you deploy per-user file type associations (FTAs) in a shared session Windows environment? By this I mean primarily users on RDS or Citrix XenApp, where altering the per-device FTAs simply doesn't cut it.

Before I go on, I'm well aware there are loads of different ways this could be done and people will already have things implemented that do it quite adequately. I'm looking at this from a perspective of those who are at the upgrade crossroads, and trying to simplify as well as enrich their environments.

FTAs

Firstly, a quick explanation of what we were trying to do. On RDS/XenApp servers, you normally have a number of users logged on and utilizing the installed applications. However, sometimes issues (usually licensing-based) necessitate that users on the same machine need different default applications associated with a single file type extension. Maybe you have Adobe Acrobat and Adobe Reader installed on the same server, and you only want certain users to run the full version when opening PDF files. Or maybe some users want to use full-fat Visio and others just need to use the Visio Viewer. We're looking at forcing particular FTAs onto particular groups of users.

We're also dealing with installed applications here. If we were discussing using published applications, we could push the FTA and the associated application from the published app (if the delivery platform supports it). However, we are primarily dealing with a published desktop with a host of installed applications in the base image.

How to do it?

The first product I thought of was, naturally, AppSense Environment Manager. However, EM doesn't have a native Action for FTAs (please, please, please, add this in a future release! PLEASE!) We do, of course, have access to PowerShell and VB from EM, but there's no PowerShell cmdlet to do anything with FTAs directly.

For years, people have been manipulating Registry entries directly, backed up by assoc and ftype (native Windows commands). So we do have the option to use assoc and ftype (called from PowerShell, naturally), and from there use EM Registry Actions to fine-tune the associations based on group memberships.


It does become a little complicated, though. You start getting into handlers, file type names, file type associations and a whole host of Registry keys. You've got the interplay between HKCR and HKLM and HKCU to consider, you've got the possibility to configure multiple file type associations - it all sounds like it is becoming horrendously complicated, not just to do, but particularly to maintain.

Isn't there an easier way to do this, short of EM actually supporting this natively? Well, yes there is. Step forward Group Policy Preferences.

Doing it with GPP

There are a few things Group Policy Preferences can do natively that EM can't, but the lack of customized triggers generally makes it my less preferred option. However, the good thing about it is because it ships with AD, it's always there as a backup for the stuff that EM can't do (or doesn't do yet).

As we are configuring this for a XenApp server, we will need to configure Loopback Policy Processing, as we are going to use the User settings on a machine basis. This sits in Computer Configuration | Policy | Administrative Templates | System | Group Policy


And then we will configure the item itself. You need to look in User Configuration | Preferences | Control Panel Settings | Folder Options and choose New | Open With from the right-hand pane.


This will allow you to specify the file extension and the program you want to open it with, and also whether you want it set as the default file type association (i.e. the one that it uses when double-clicked). You will also need to set the Action type - I'm using Replace, which will delete any existing FTA in use for that filetype and replace it with this one. In my example, I am setting the .png extension to open with Microsoft Office Picture Manager 2007.


Finally, we can use the Common tab to set some more options to narrow down the scope of the Action. What we are interested in is the Item-Level Targeting option, and the Targeting button that allows us to choose the scope.


Now we can select from a whole host of available options to apply this to a specific subset. We are going to do it using an AD security group, but GPP has a nice wide variety of choice similar to EM itself.


And of course, don't make the mistake I always do and forget to link the new object to the relevant OU!

Once we deploy this, it should overwrite the FTA setting for the particular extension to whatever we have configured for the specific user group. The main advantage is that it's nice and easy to support, which was something we weren't going to get by using EM with targeted PowerShell assoc/ftype commands and Registry Actions.

Notes on this method

As this is a Group Policy Preference item, rather than a Policy, it won't overwrite any changes the user makes. In my testing, I was using local profiles on a single XenApp server, and if I changed the association manually, at next logon the manually-set FTA was still present. So if you want to be able to switch things around for the FTAs at some point using a central mechanism, but also allow users to maintain other FTAs they set manually, you will have to get around this somehow. There are probably a load of ways to do this, but as I am predominantly concerned with AppSense stuff we will attack it from this perspective.

In an EM environment, users generally dump their profiles at logoff, which means that if you don't want users to be able to alter their FTAs at all and just have the preconfigured ones, this is ideal. But if they select a custom FTA that you haven't set through GPP - for instance, opening .csv files in Notepad - you may want to allow them to persist this.

Personalization Server or EM Policy Registry Hiving are the obvious choices for this. You simply need to make sure that you capture these Registry keys into Session Data (for Personalization) or into Registry Hiving Actions.

HKEY_CURRENT_USER\Software\Microsoft\Windows\CurrentVersion\Explorer\FileExts

and

HKEY_CURRENT_USER\Software\Classes\Applications

These keys will allow user FTAs to persist.

If you wanted to customize this further - for instance, to set the default .pdf FTA to Adobe Reader and not allow users to change this, but allow them to change and maintain all others - you'd have to get a bit cleverer. Session Data doesn't allow exclusions, so you'd have to specifically add all the filetypes you wanted to save (a nasty job), or use something like APPSENSESPECIAL to remove the .pdf keys from the user's Personalization data at logoff.

Summary

Anyways - I get asked a lot of times about if you can set FTAs in Environment Manager. The simple answer is, yes you can, but it takes a lot of configuring and involves using PowerShell to call internal Windows commands alongside Registry key manipulation. Part of having a successful implementation is selecting the right tool for the job, and in its current incarnation (8.4 at time of writing), EM isn't the best tool available. Even though it takes part of your solution out of one technology and into another, simply from a support and maintenance perspective, this is one situation where I'd happily choose GPP to do the business.

Hopefully, though, EM will soon support FTAs natively, because getting this working in SBC environments can become a real PITA.

I'd also be very interested in hearing how others have dealt with this issue....it may well be there's a much slicker method I hadn't considered.

Getting to grips with Windows 8.1 #1 - Using AppSense DesktopNow to eliminate the Charms Bar

$
0
0
Wow! I've been so busy lately, I've been unable to complete some of the articles I've been drafting for ages. I've got some great stuff in the pipeline, but in between doing presentations, writing articles, attending conferences, beta testing, day-to-day work and of course trying to spend time with my family, blogging has been sadly neglected.

To counter this, I've decided to try and do a bit of a series on something I seem to be seeing more and more questions about - Windows 8.x, and managing it from an EUC perspective (using AppSense obviously, but not exclusively). Rather than hammer everything into one article, I thought I'd flesh it out a bit, simply to try and avoid another period of sad neglect for my loyal readers!

The repulsive Charms Menu

Charmless
One of the first (and most annoying) things that I quickly found out about Windows 8.x (I'm doing all my testing on 8.1, for the record), is that it has not been policy-enabled particularly well, or even remotely comprehensively. It's true that meaningful corporate restriction GPOs often lag behind versions of Windows quite dramatically, but this is Windows 8.1 Update 1, and that seems far enough ahead of the 8.0 curve to have addressed this by now.

The worst thing is, though, the Charms menu seems to actually offer users a way of circumventing settings that have been deployed via Group Policy. Yes, you can actually use the Modern UI to poke holes in your carefully-constructed corporate policies which protect users from themselves. Need an example? Well, the first one I could dig up was this.

Use Group Policy Preferences to set the proxy server for Internet Explorer, by using the Registry setting for ProxyServer in HKEY_CURRENT_USER\Software\Microsoft\Windows\CurrentVersion\Internet Settings. Then use the Group Policy Object User Configuration | Policies | Administrative Templates | Windows Components | Internet Explorer | Disable Changing Connection Settings to lock it down, effectively disabling the entry point for LAN Connections in Internet Options.


All well and good - until the user swipes up their pesky Charms Bar. Go to Settings, | Change PC Settings | Network | Proxy. What do we see?


Yes, you can change the proxy with impunity, effectively circumventing the GPO.

Now, hold onto your horses - this is just an example, so before you start screaming about WPAD config files and telling me how any app that doesn't use the correct proxy shouldn't be able to find a way out to the big bad Intertubes, take a moment to think. The most worrying possibility is that this is just the first example I could find of there being a hole that users could slip through GP-wise by using the Charms bar. Mitigate this particular one through other technologies, and you may find there are many others that have slipped under the radar unnoticed.

Group Policy Objects

There areGPOs for Windows 8.x/Server 2012, this we know.Surely there must be one that lets us block access to the Charms bar?

Unfortunately - no, there's not. But there is something that may offer some hope. It is the setting for User Configuration | Administrative Templates | Control Panel | Prohibit access to Control Panel and PC settings. If we can't kill the Charms bar itself, we can stop access to the PC settings link, yes?

However, this GPO goes far above and beyond what we want. You can't access PC settings...as you can see below, the link has disappeared now that the policy is active...


...but there are further side-effects to defining this policy. For instance, try getting into Control Panel via any of the entry points...


...and you will find you've been unceremoniously blocked. Effectively, if I restrict access to PC settings from the Charms bar, I also kill Control Panel completely. As my users generally like (and need, to be fair) to access parts of Control Panel, such as Accessibility, Mouse, Keyboard, etc., this is a total non-starter.

Software Restriction Policies/AppLocker/Application Manager

Next up is a thought that maybe you can restrict the execution of the PC settings link by using SRPs, AppLocker or even Application Manager. An interesting idea....let's see what mileage it has.

The executable that runs when you open the PC settings link is %systemdrive%\Windows\ImmersiveControlPanel\SystemSettings.exe, and as this is an AppSense-focused site, we will restrict it using AppSense Application Manager. You could, though, quite easily do it through SRPs, AppLocker, or your application management software of choice.


Once we've saved and deployed it through our mechanism of choice, we can then give this a whirl and see how it behaves.


Again, this is a disappointing outcome. It doesn't display the normal Application Manager dialog box, the user isn't given any indication that corporate policy is blocking them...all in all, not a suitable screen to be presenting a user with. Restricting the execution, whilst promising, doesn't give us the results we need.

Native Windows 8.1 options

Now in Windows 8.1 Update 1 there is the Navigation tab in Taskbar and Navigation Properties, which has various options to do with the charms. Can we use this to help us?

Firstly, we need to find the Registry values that these options refer to, so that we can deploy them without touching every endpoint manually. Again, Group Policy Objects would be so helpful here. A bit of digging reveals the pertinent Registry locations, so we will now bundle them into Environment Manager and deploy. The keys and values we need are

Keys
HKCU\Software\Microsoft\Windows\CurrentVersion\ImmersiveShell\EdgeUI

Values
DisableCharmsHint, REG_DWORD, 1
DisableTRCorner, REG_DWORD, 1
DisableTLCorner, REG_DWORD, 1

Here is the EM configuration we will use to push these out, but it could be done in any one of many ways


Once we've deployed this, let's go to test again.

In this case, the main "hot corners" are all successfully disabled - but there are still a couple of Charms bar entry points active. If you move to the bottom right-hand corner and swipe up, or if you use Win+C, the menu appears. So this, although it helps us out by killing the other "hot corners" (some useful progress), we're still not where we want to be, which is blocking access to it completely. Hmmm.

Environment Manager lockdown

We can definitely block the Win+C keyboard shortcut using Environment Manager Lockdown items - so maybe this is the path to choose. Can we use the General Lockdown tool to exterminate the Charms bar completely?

At first glance, it seems promising. The Spy Tool seems to pick up the Charms bar successfully...


...but when deployed, it doesn't do anything to block it. Not sure whether the General Lockdown wizard is currently incompatible with the Modern UI, but it definitely has no effect - another disappointment. Locking out Win+C works fine, so we're slightly nearer to our goal, but still missing the main thrust of the exercise. This is starting to become ever so frustrating!

Third-party tools

This is always my last port of call, particularly in enterprise environments, but given that there are no scripted techniques I can find for manipulating the Charms bar, this is where we've arrived.

Googling allows us to find that WinAero have a program called the Charms Bar Killer. It seems to work nicely enough - all we need to do is put it either in the base image or on a network share, and then set some Registry keys to auto-hide it.

First we set the Registry value so it auto-hides when executed (a blank value is what's required, this isn't an error)


and then we simply execute the file as part of the Logon trigger from our specified location. No special context or switches are required


Now it's down to testing again....and this time, we finally have blocked the entry point to the Charms bar! Hot corners, the swipe from bottom right, the Win+C key combination - all of these entry points are now blocked. Thank [deity] for that!

When the user logs in, the executable launches but is hidden from the notification area. It can be seen in Task Manager, but don't worry if the user inadvertently ends the process - the Charms Bar will stay locked away unless the user restarts explorer.exe in addition to ending the process. Handy!

Summary

The main conclusion that can be drawn from this is that it's very hard to make certain parts of the Modern UI acceptable for corporate deployment. It's especially disappointing that a third-party tool has been used to achieve our goal here, because this won't fly in a lot of environments I've worked in, simply because using downloaded freeware is a big no-no for most security teams.

I'm hoping Microsoft expand the GPOs available or make some part of the user interface able to hide the Charms bar. Maybe something for Windows 8.1 Update 2? But until then, this is the only way I could find to do it.

Anyway, I hope this is useful to some of you out there....more Windows 8.1 articles coming very soon, in addition to getting some of my half-finished stuff finally published :-)

Winds of change - AppSense DesktopNow EM 8 FR 5, AM 8 FR 8 and AMC 8 FR 6 are approaching!

$
0
0
I've been pretty quiet recently because I've been very busy doing (amongst other things) beta testing on what will very likely turn out to be a very big release for AppSense DesktopNow, Environment Manager 8 FR 5, Management Center 8 FR 6 and Application Manager 8 FR 8. It's quite an exciting release, as there are loads of new features and improvements - some of which can be covered adequately in this article, and others that are big enough changes to warrant articles of their own (coming soon!)

I'd just like to start by saying that it's a good sign that so many improvements have been factored in to these releases, particularly in Environment Manager, where most of you will notice the most dramatic changes. Hopefully this is a clear indication that AppSense do listen to their customers and their community, because there are a lot of changes that we've been clamouring to see for a while in this release.

Environment Manager Policy

The lion's share of the changes are to be seen in Environment Manager. I can understand that admins may be a bit uneasy about this, as some of the more major ones are on the Personalization Server end and will need to be tested thoroughly as part of the upgrade process. However, once you realize what potential extra functionality can be brought by utilizing these new features, I doubt that admins will be quite as uneasy about deploying it.

New triggers

One of the main changes you will notice straight away are the new triggers in the AppSense Environment Manager Console. These are way overdue. For years now, AppSense administrators have been using Custom Scripted Actions to wait for the network at Computer Startup and also to delay actions until "after" the logon appears to have finished (see my blog post on the latter here).  But with the advent of EM 8 FR 5, we can kiss goodbye to these scripted Actions and do all of this natively.

Firstly, you will see a Network Available trigger under the Computer section. Under the hood, this trigger uses NLA (something I used in PowerShell occasionally for network detection).


Now, as you probably can guess, this isn't clever enough to differentiate between specific network connections, but it sure will make life a hell of a lot easier. I can remember a lot of frustration when AD lookups or file/folder copies would fail because the network was unavailable, even though Group Policy Preferences could copy network-based files with apparent impunity. Using a Wait For Network script became almost standard procedure in some configurations. But now - we can detect boot-time network connectivity with a native Trigger. Add in after this a quick check for the corporate network (by checking a file share, host response, pick your method really), and you should have a reliable way of identifying when a system is online, and whether it it is remote or internal.

Under the User section, you will see even more new Triggers - Pre-Session, Pre-Desktop, and Desktop Created, sounding the death-knell for the scripts and/or executables that everyone leveraged to delay certain Actions until "after" the logon had finished. AppSense have, though, gone beyond what we managed with our customized methods and given us three new triggers to utilize.


The descriptions I found a bit confusing (bear in mind this was the beta version), but this should clear it up...

Pre-Session - actions defined here take place after the user has supplied their logon details and the user profile has been created, but before the user "session" itself specifically starts.

Pre-Desktop - actions defined here take place during the initialization of the user's session, but before the shell actually starts

Desktop Created - actions defined here take place after the shell has started

What we achieved previously with the custom post-logon triggers obviously should be transferred into Desktop Created. Actions defined in the old, pre-8.5 Logon trigger should be replicated in the Pre-Desktop area (in fact, this is where they will transfer to when an older configuration is upgraded). Pre-Session could be used for environment variables, registry settings and group policy objects that perhaps you may previously have hard-coded into the mandatory profile, or to hold anything that you want to process entirely before the Pre-Desktop trigger begins.

When you first upgrade your configurations, you'll be asked if you want to enable these new triggers, or stick with the old ones for now. The change requires a client restart to take effect - but given that this is a major upgrade, I would expect restarts to be done as a matter of course anyway.

New Conditions

We haven't just got new triggers, but new Conditions too. Both of these should prove useful, I have written many custom detections for these in the past, and blogged about them on occasion.

Is Laptop - does exactly what it says on the tin. Shaun points out in the comments that it simply checks for the presence of a battery, so I may do some testing on tablets to see what behaviour it exhibits in those situations, but it replicates the way a lot of us have done it in the past anyway.


Is VDI - this detects whether a machine is running a virtual desktop. This is quite handy, but a bit limited in its scope, as it will only detect Citrix XenDesktop and VMware (Horizon) View at the moment. I would hope this is going to be expanded in future a little.


New session variables

This is a really big improvement (in my opinion, anyway), and it's unfortunately tucked away deep in the console. Using this should hopefully reduce the logon times of almost everyone out there. If you're spoofing the user profile type to dump local profiles at logoff (as a lot of people are), you will have to pull a value out of the HKLM area of the Registry to get the user's SID in order to change the profile type. Most everyone has done this via a scripted method - VB, PowerShell or WMI being the favourites. Of course, everyone who has done detailed analysis of logon times knows that firing up scripted Actions can give you a little bit of drag, so it's often prudent to keep these to a minimum. In EM 8 FR 5, there's a session variable for the user's SID (and a couple of others too) which are now available by default, so simply by using $(UserSID) in your Registry or File Actions, you will be able to avoid having to use a script to extract the SID information in the first place. You can view the available built-in session variables by looking under the Insert menu in a Custom Condition or Action.


I've raised my concern with how "hidden" this nifty little feature is with AppSense and I'm hoping they make it more visible to the administrator in the GA release, because it should improve a lot of the configurations out there.

Mid-session config changes

The "mid-session config" bug can be a major pain (dependent on how unlucky you are). If you're very unlucky, it can cause GPOs, shortcuts, printers and drive mappings to reverse or even disappear. It's normal practice to get around this by keeping config deployment at computer startup or inside change windows, but there's always the chance configurations can be erroneously deployed when users log in. There's also the overhead of staff having to work late to deploy new configurations in specific change windows.

In EM 8 FR 5, there are now options to deal with mid-session config deployment. However, the new options provided almost seem to be in conflict with the Installation Schedule settings in Management Center. I'm wondering if the new settings are intended for enterprises who use other technology (such as SCCM) to deploy configurations rather than those who use the Management Center? It does give some interesting options, though, effectively allowing you to have a configuration-based option to deploy immediately or delay, rather than having this tied to the Deployment Group.

Update - as Shaun Jones pointed out in the comments, the new feature here handles how existing sessions deal with the installation of a new configuration, not when the configuration is actually installed to disk. Both features work hand-in-hand to give you more control.


If you use the "At Logon" option, new logon sessions would load the new configuration, existing sessions would remain using the old (cached) copy and remain unaffected by the change. Thanks to Shaun Jones again for clarification of this via his comments.

Again, please bear in mind this is only the beta release I am referring to and I have fed my opinion back to AppSense, so how this feature is documented may well be improved in the GA release.

New Actions

Not just triggers and Conditions, we have a couple of new Actions too!

Logon/Logoff Message - this allows you to display a custom message at logon or logoff (dependent on which section you use it in), which you can even use multiple times to display different messages at different parts of configuration processing. This may make things look slicker for the user, or keep them aware of what's going on, or perhaps even be of limited use as a troubleshooting tool.


Fast Logoff - this is another trick that has been absorbed into the AppSense EM armoury, the old trick of disconnecting the session to make for a faster logoff time. I blogged on it (I think it was on my first day as a blogger!), but this is another customized function you can now do natively instead.


No more enabling local Group Policy processing

Another important change is that you no longer have to keep local Group Policy processing enabled in order for AppSense EM to be able to run logoff Actions correctly. For a very long time now, EM has avoided being terminated by Windows at logoff time by leveraging Group Policy to call its logoff actions, as Group Policy is allowed as long as it wants to process. This has been changed in EM 8 FR 5 so that there's no need to avoid disabling local group policy processing (killing off yet another of my articles in the process).

Some cool interface changes

There have also been some good changes to the user interface of the console itself...

Expand/Collapse All - allows you to collapse or expand an entire Node or Action subtree with the click of a button


AND/OR indicators - these are now much more intuitive. I've lost count of the number of times someone asked me "what does the blue bit mean?" when they'd just created an OR relationship. Now they look like this, which should stop all the questions


Stop If Fails description - you will also notice from the above image that the cryptic "Stop If Fails" checkbox is now the much-more-intuitive "Stop sub-nodes on fail". Also, a node with "Stop sub-nodes on fail" configured will now have an icon indicating such - not sure what the icon will look like in the final RTM version, but there should be one.

Find/Replace fixed - literally since the first time I worked with version 8.0, I have hated the Find/Replace dialog box with a passion, and particularly the way the Enter button triggers the "Cancel" function. To this day, I still type in a search parameter and hit Enter, only to curse the developers as the dialog disappears. But - no longer! Not only this, but the whole dialog has been vastly improved.


Personalization Override

I never had a lot of dealings with the Personalization Override feature of Process Started Actions, but apparently this now works correctly. So good news for those who've felt the pain of this particular problem!

Personalization Server

Moving forwards, the really big interface and operational changes - the ones that you will notice quite strongly - are to be found in the Personalization Server area of the console.

Desktop Settings and Session Data have now been aggregated under the heading of Windows Personalization. This means that Personalization Server effectively splits into two main areas - Windows Personalization, and Application Personalization. Once you've upgraded, your old Desktop Settings will be displayed as Legacy until such a time as you are ready to remove them.

Windows Personalization allows you to work with what you previously knew as Desktop Settings and Session Data in much the same way you would work with Application Personalization. You create Windows Settings Groups the same way as Application Groups, add files/folders and Registry keys to them, and link them to Personalization Groups. The old Desktop Settings configuration items are all readily available as pre-created Windows Settings Groups, and you can add your own as necessary. But one of the biggest changes is that each Windows Settings Group can have Conditions applied to it - not just the very basic "Windows Family" separation in earlier versions of Personalization Server, but the whole array of Conditions from EM Policy!

Application and Windows Personalization working together
EM Policy Conditions in a Windows Settings Group

Windows Personalization will need an article of its own to get to grips with everything that you can do with it, but there are many great features in there and a load of things you could achieve with it. For instance, you could now manage Taskbar Pinned Items for Windows 7 and Windows 2008 R2 machines on an individual basis rather than having them lumped together - a major pain when these systems may well have different application sets!

There are improvements elsewhere in Personalization Server as well. The Default Blacklist has been replaced by a global Application Exclusions list. Each Application Group can now have filetypes excluded on a per-group basis, instead of just a global list. You can configure new Personalization Group settings such as pre-caching, so that apps are ready to run when users need them, and sync the Windows Personalization data not just at logon/logoff time, but at Session Lock and Disconnect.


It doesn't stop there - the Pre-Session trigger in Policy also allows EM now to Personalize DPI settings correctly (good news for @byteben). And here's another big one - when an exclusion is configured for an application or group, any data that was saved previously but is now specifically excluded is automatically removed from the Personalization database! Goodbye to custom SQL scripts and widespread usage of APPSENSESPECIAL to get rid of extraneous Personalization data! Add to this better performance and new certificate functionality, and you can see that there's a hell of a lot contained in the Personalization Server upgrade.

I'm going to do an article very soon on Windows Personalization and how you can get things done with it - stay tuned.

Management Center

Multiple instance support

The major change in Management Center (and also, for that matter, Personalization Server) is that they now support multiple instances on the same web servers. Imagine that you've got two AppSense databases, one corporate, one education. To support these currently, you'd need two Personalization Servers and two Management Servers - four servers for your AppSense infrastructure, and that's before you start factoring in any redundancy.

With AMC 8 FR 6, you can now put up to seventeen instances per web server (default plus sixteen others). That could potentially drastically cut down on the number of servers needed to deploy a redundant AppSense infrastructure.

There are also PowerShell cmdlets included for working with multiple instances. I've mentioned to AppSense that PowerShell compatibility is one area I'd like to see a lot more of, and this is further progress in this area.


Custom configuration file location for non-persistent VDI support

Yet another of my articles bites the dust, as AMC 8 FR 6 introduces the capability to configure the AppSense configuration file location on a Deployment Group basis. This will allow non-persistent VDI sessions to redirect it to a persistent disk or location without messing about with mklink, subst or similar commands.


This is another excellent addition, in my opinion, addressing another of AppSense admins' long-standing gripes.

Application Manager

Finally, Application Manager 8 FR 8 will introduce a Change Request feature, which will allow users to request updates to their application whitelists and execution privileges that can be then routed to support and actioned. It will also have a change tracking feature like EM, and other new things besides that probably also warrant a full article from me.

Summary

The new releases of DesktopNow, and most particularly the Environment Manager side, are going to bring huge improvements. But in order to encompass these improvements we will all need to make sure we upgrade carefully and with a good, tested backout plan, as there are a lot of changes going on.

No release date is confirmed yet but I would think that it is going to be within the next month or so, all things being well, so now would be a good time to start thinking about how to plan for an upgrade - and what we are going to use all those cool new features to achieve for our users! But kudos again to the guys and gals at AppSense for addressing a lot of our long-standing gripes - long may this continue.


PS - here's hoping England whop Uruguay tonight in the World Cup, with apologies to any Uruguayan readers I may have picked up.

The DesktopNow APPSENSESPECIAL command switch

$
0
0
I still get a lot of emails and queries from people about how to manipulate Personalization Server data. So today, although to many of you this may be basic stuff, we will have a quick run-through of how to make sure your use of the APPSENSESPECIAL command switch is correct, and a few troubleshooting techniques you can use with it.

Situations where APPSENSESPECIAL can be used

APPSENSESPECIAL is used specifically when you need to manipulate data stored in Personalization Server. You might want to do things such as:-

a)  remove a file, folder or Registry key/value that has been mistakenly copied into Personalization data

b)  add a file, folder or Registry key/value to Personalization (although this could easily be done by a Process Started Policy Action instead)

c)  transfer existing settings into Personalization data ahead of a migration

d)  move Registry or file data from Personalization into the "real" Registry or filesystem

d)  allow users to selectively manipulate Personalization data without launching the application (e.g. clearing a cache that interferes with application operation)


Client-specific masquerading apps

In AppSense's Global Settings you can create a Masquerading Application to allow a specific application access to another (Personalized) application's data - for instance, allowing the Mail Control Panel applet to access (and therefore configure) Personalized Outlook data, without having to put the apps in an Application Group. This setting, however, is global, so if you need to do anything more targeted, you will have to use APPSENSESPECIAL to produce client-specific masquerading.

What the APPSENSESPECIAL switch does is allows a specified client application to imitate or "masquerade" as the Personalized application, allowing you to open up the virtualized settings and manipulate them with standard tools. When the masquerading app closes, the changed settings are sent back up to the Personalization Server and saved.

It is important to remember how Personalization works
  1. Managed application starts
  2. Config file created with file and Registry inclusions detailed
  3. Virtual cache (%systemdrive%\appsensevirtual) is synchronized with the SQL database
  4. EM Policy is notified of the process start and any Policy Actions are performed on the virtual cache
  5. While the application is running, changes to the Registry and filesystem are intercepted and written to the virtual cache, rather than the "actual" Registry or filesystem
  6. Managed application (or application group) stops
  7. Virtual cache is synchronized back to the SQL database
Bearing this process in mind should let you understand how the client-specific masquerading apps principle works. Effectively, you are subverting step [1] of this process - launching what the EM Agent believes is a managed process, but which is essentially something else.

Using APPSENSESPECIAL in normal mode

In order to demonstrate how to use APPSENSESPECIAL we will do something very simple. We have configured our Personalization Server to personalize Microsoft Paint (mspaint.exe). What we are going to do is delete the Registry value that applies gridlines to the Paint application as the user logs in. Obviously we could simply do this by changing the setting within the application itself, but that wouldn't demonstrate how we can alter Personalization data on-the-fly, then, would it? :-)

If we log on to one of our test desktops and launch Microsoft Paint, we can see that the view is configured to show gridlines, as below. The Paint executable is being Personalized, so the setting persists from endpoint to endpoint, as we'd expect.


The Registry key that controls this can easily be seen by looking through Personalization Analysis


So let's assume, for some strange reason, we don't want this user to see the gridlines option next time they open Microsoft Paint. We could just alter it in Personalization Analysis, but if we wanted to do this for a hundred users, it would be a long laborious process. By using APPSENSESPECIAL as part of their logon process, we could actually remove the entry for each user at logon time, saving time and effort - and obviously giving myself a simple task to demonstrate this command with :-)

The way we can call the manipulation of the Personalization data is by using a Logon Action. The application we will use is cmd.exe. Although you can call any executable and load the Personalization data along with it, cmd.exe is often the preferred one. This is because a lot of other applications sometimes don't work correctly or as expected when run with lots of extra command-line arguments. Cmd.exe is ideal because you can call out to just about any other external application from it to manipulate the data - xcopy, robocopy, reg, regedit, anything you require really.

However, if you're going to use reg.exe or regedit.exe (as we are in this example), you need to make sure they're not blacklisted in Personalization Server. You can either remove them from the blacklist, or create a copy of the application with a different name (e.g. reg-appsense.exe) and call the copied version instead. The choice is yours.


Once we've sorted out the access to reg.exe, here's the command we will use

c:\windows\system32\cmd.exe /APPSENSESPECIAL:mspaint.exe:0.0.0.0 /c c:\windows\system32\reg.exe add HKCU\Software\Microsoft\Windows\CurrentVersion\Applets\Paint\View /v ShowGrid /t REG_DWORD /d 0

The first part runs cmd.exe with the following /APPSENSESPECIAL switch. After the colon, you supply the name of the executable you wish to load the Personalization data for. After the second colon, supply the version, if you actually need to work with a specific version. If you do need to supply the version, try not to use regular expressions here. If you don't need a specific version, use 0.0.0.0 as above.

After the /APPSENSESPECIAL switch, the /c parameter allows you to then call the command to manipulate the Personalization data. In this case, we are using reg.exe with the ADD parameter to change the Registry entry that deals with the gridlines in Paint to a 0 instead of a 1.

If you used this as a Logon Action in EM (a very sensible way to call it), the Action would look like this


The "do not create window" option obviously hides the execution from the user. The "do not execute children" option should also be selected, particularly if you're running multiple /APPSENSESPECIAL commands. Running them all together can cause the process to hang, so if you have multiple ones, select this option and nest them inside each other.

Once we've saved this Action into our configuration and deployed it, we should now be able to logon and run the Paint executable again. Whereas previously the Personalization data restored the gridlines, this time we don't see them


So we've now demonstrated a very simple way of how to open up and manipulate the Personalization cache. Admittedly, this example simply alters a value - something you could easily do in Policy instead - but it gives you an idea of what can be done.

Expanding the scope of this, you could use this ahead of a migration to load files into Personalization Server ready for the user to be moved across - think Outlook signatures, Word custom dictionaries, all those sorts of things, just use /APPSENSESPECIAL with robocopy or xcopy (although you will also need to enable the migration flag on your Personalization Group to help this process). You could have a user-triggered function that would clear out an application's cache or temporary files. I've used this in the past where the FileTypeExclusions setting has not been configured properly and lots of PDF and DOC files have made their way into Personalization data - the APPSENSESPECIAL switch allowed me to drop these extraneous files from the user's Personalization profile as they logged in. The amount of uses you will be able to find for this are probably quite wide.

Using APPSENSESPECIAL in interactive mode

What you can also do is use APPSENSESPECIAL in interactive mode. It's also quite nifty to combine this with Shaun Jones' wonderful tool PersInfo to see if the application is masquerading correctly.

In order to trigger the interactive mode, you would run cmd.exe specifically from the user session, but with the /k switch. Obviously the endpoint needs to have the AppSense agents on it for this to work. Before you start to do this, run PersInfo so it is in the notification area as well.

cmd.exe /APPSENSESPECIAL:application.exe:0.0.0.0 /k

As an example, we will load the data for Microsoft Word (version 12)


When the instance of cmd.exe launches, you will see (if you've got PersInfo running) that it has a funky shocking pink border


This indicates it is masquerading - a fact you should then see PersInfo confirm for you down in the notification area.


From within your command window, you can now manipulate the Personalization data directly using the commands you choose (note in this example, we are using a copy of reg.exe, reg-appsense.exe, to avoid the blacklist)


And once you close the masquerading app and it synchronizes with the database, running Personalization Analysis should show the fake data we just inserted


The interactive usage of APPSENSESPECIAL would be more for troubleshooting purposes, which is useful to know if a masquerading application doesn't behave as you'd expect it to.

I did notice that I had great trouble getting an application to masquerade when, for some reason, two instances of the same process (iexplore.exe) had been added to an Application Group (the x64 and x86 versions had been explicitly defined). This may be worth checking if you can't get an application to work properly with APPSENSESPECIAL (thanks to AppSense support for sorting that issue out for me).

Summary

So, hopefully this should give you a thorough run-down of how to use, and what you can do with, the APPSENSESPECIAL switch. It is certainly very handy for cleaning up Personalization data and aiding migrations. However, with the arrival of EM 8 FR 5 and its "auto-cleanup" feature, we may not have to leverage the command switch as much in future.

AppSense EM 8 FR 5, AM 8 FR 8 and AMC 8 FR 6 are now available for download!

$
0
0
Just a quick spot of news today....the new versions of AppSense software we discussed in a previous post are now on GA and available on www.myappsense.com for download. There are over 250 new features available in this release, most of them in response to customer feedback, so there should be a level of maturity and stability in this release that will make it a lot more palatable to some of the hardened AppSense admins out there.

The biggest change, as I alluded to previously, is the Windows Personalization section. As soon as I've downloaded the GA version and had some time to check it over, I should have an article out discussing the finer points of this change.

Happy installing and/or upgrade planning!

Customizing the visible Libraries in Windows 7 and up

$
0
0
This is a bit more of an EUC post rather than a specifically AppSense one. It deals with one of the most annoying bits of the user interface when upgrading users to Windows 7 or higher - that of the Libraries feature.

Libraries are a way of aggregating views in Windows Explorer (or File Explorer, as it's now known in Windows 8 and upwards). They simply bring together a collection of folders into one view. Removing folders from the Library doesn't remove the files from disk - effectively, they are just linked views that can connect to multiple locations on the same or many computers.

The problems with Libraries are that a) users are often used to doing things in different ways, particularly in environments with controlled network drive access, and b) the implementation of them isn't very straightforward, and they can't be managed particularly well with GPOs, making central standardization a real drag. Under the hood, libraries are controlled by a collection of .library-ms files that sit in %AppData%\Microsoft\Windows\Libraries, and they are in an XML file format, which (in my opinion, anyway) don't lend themselves to easy management.

The yucky innards of a Windows Library file
By default, Libraries contain a couple of locations, and changing this (normally to remove the Public folder for a particular Library) can also be a royal pain in the backside. This article doesn't concern itself with this issue, but you can achieve it (amongst other ways) by changing the base/default profile, or by editing the .library-ms files directly and then deploying them through whatever means you find easiest. There isn't much GPO support - a lot of admins find themselves deploying File Actions in AppSense EM or Group Policy Preferences to get around this limitation.

An AppSense EM Mirror Action providing customized Library files to the endpoint

What we are concerned with in this article, however, is trying to provide a way to disable Libraries on a per-Library basis. In the default configuration, you get four Libraries - Documents, Pictures, Music and Videos. Depending on your organization, some of these folders may not really feel relevant or appropriate, so it would be useful to find a way to easily and quickly disable any of them that you feel aren't necessary.

The default set of four Libraries

Some digging on the Intertubes eventually turns up a Group Policy Object that may help us here. It is User Config | Admin Templates | Windows Components | Windows (or File) Explorer | Disable Known Folders.

The policy object prevents the underlying file or directory being created, so if the folder already exists, you will need to remove it first. You can specify a "Known Folder" by using either the known folder ID or the canonical name, but I find the folder ID more robust. You also need to be careful in case you have any applications that depend on the existence of the folder. I'd categorize them as poorly-written applications if they do, but we've all got to support or deploy bad applications, so it pays to do some analysis.

We can deploy the setting via standard GPO, AppSense Environment Manager, or any other software with similar capability. Naturally, I will be doing it through Environment Manager.

To disable the Videos folder, use this folder ID - {491E922F-5643-4af4-A7EB-4E7A138D8174}


To disable the Pictures folder, use this folder ID - {A990AE9F-A03B-4e80-94BC-9912D7504104}


To disable the Documents folder, use this folder ID - {7b0db17d-9cd2-4a93-9733-46cc89022e7c}


To disable the Music folder, use this folder ID - {2112AB0A-C86A-4ffe-A368-0DE96E47012E}


And obviously you can mix and match these as required to produce more refined results


In some situations, dependent on the policy objects or profiles in use, you may see some aberrant results. I found myself in an environment recently where disabling the Music library didn't work - for some reason the folder ID specified above disabled all of them!

In this case, it involved some scripted trickery to get the results I wanted. What I did was take a script that re-enabled all of the libraries - and then simply commented out the lines for the Music library. Here's how it fitted into the EM configuration.

 
The script (which I'm not sure where I got it from, so apologies if I am printing someone's hard work without credit) is reproduced as I used it below. If you have bother with a particular library, then modify the commented-out lines as needed to "restore" the libraries you require.

Option Explicit

Const ForReading  = 1
Const ForWriting  = 2
Const ForAppending  = 8

Dim WshShell : Set WshShell = CreateObject("WScript.Shell")
Dim objFSO : Set objFSO = CreateObject("Scripting.FileSystemObject")
Dim objTextFile
Dim iMainTeller, iError
Dim strProfilePath, strLibrary

strProfilePath = WshShell.ExpandEnvironmentStrings("%appdata%")
If Right(strProfilePath,1) <> "\" Then strProfilePath = strProfilePath & "\"

For iMainTeller = 1 To 4
 Select Case iMainTeller
  Case 1 : strLibrary = "Documents"
  Case 2 : strLibrary = "Videos"
  ' Case 3 : strLibrary = "Music"
  Case 4 : strLibrary = "Pictures"
 End Select

 If Not objFSO.FileExists(strProfilePath & "Microsoft\Windows\Libraries\"& strLibrary & ".library-ms") Then  
 
            If Not objFSO.FolderExists(strProfilePath & "Microsoft\Windows\Libraries") Then
                On Error Resume Next
                objFSO.CreateFolder(strProfilePath & "Microsoft\Windows\Libraries")
                Err.Clear
                On Error Goto 0
            End If

  On Error Resume Next
  Set objTextFile = objFSO.CreateTextFile(strProfilePath & "Microsoft\Windows\Libraries\"& strLibrary & ".library-ms",True)
  iError = Err.Number
  On Error Goto 0
 
  If iError = 0 Then
  objTextFile.WriteLine("<?xml version="& Chr(34) & "1.0"& Chr(34) & " encoding="& Chr(34) & "UTF-8"& Chr(34) & "?>")
  objTextFile.WriteLine("<libraryDescription xmlns="& Chr(34) & "http://schemas.microsoft.com/windows/2009/library"& Chr(34) & ">")
  Select Case iMainTeller
      Case 1 : objTextFile.WriteLine(vbTab & "<name>@shell32.dll,-34575</name>")
      Case 2 : objTextFile.WriteLine(vbTab & "<name>@shell32.dll,-34620</name>")
     ' Case 3 : objTextFile.WriteLine(vbTab & "<name>@shell32.dll,-34584</name>")
      Case 4 : objTextFile.WriteLine(vbTab & "<name>@shell32.dll,-34595</name>")
     End Select               
  ' ownerSID will be added by Windows when first accessed
  objTextFile.WriteLine(vbTab & "<version>8</version>")  ' since no current version can be found a random one
  objTextFile.WriteLine(vbTab & "<isLibraryPinned>true</isLibraryPinned>")
  Select Case iMainTeller
   Case 1 : objTextFile.WriteLine(vbTab & "<iconReference>imageres.dll,-1002</iconReference>")
   Case 2 : objTextFile.WriteLine(vbTab & "<iconReference>imageres.dll,-1005</iconReference>")
  ' Case 3 : objTextFile.WriteLine(vbTab & "<iconReference>imageres.dll,-1004</iconReference>")
   Case 4 : objTextFile.WriteLine(vbTab & "<iconReference>imageres.dll,-1003</iconReference>")
  End Select
  objTextFile.WriteLine(vbTab & "<templateInfo>")
  'http://msdn.microsoft.com/en-us/library/windows/desktop/dd798386%28v=vs.85%29.aspx
  Select Case iMainTeller
   Case 1 : objTextFile.WriteLine(vbTab & vbTab & "<folderType>{7D49D726-3C21-4F05-99AA-FDC2C9474656}</folderType>")
   Case 2 : objTextFile.WriteLine(vbTab & vbTab & "<folderType>{5fa96407-7e77-483c-ac93-691d05850de8}</folderType>")
  ' Case 3 : objTextFile.WriteLine(vbTab & vbTab & "<folderType>{94d6ddcc-4a68-4175-a374-bd584a510b78}</folderType>")
   Case 4 : objTextFile.WriteLine(vbTab & vbTab & "<folderType>{B3690E58-E961-423B-B687-386EBFD83239}</folderType>")
  End Select 
  objTextFile.WriteLine(vbTab & "</templateInfo>")
  objTextFile.WriteLine(vbTab & "<searchConnectorDescriptionList>")
  objTextFile.WriteLine(vbTab & vbTab & "<searchConnectorDescription publisher="& Chr(34) & "Microsoft"& Chr(34) & " product="& Chr(34) & "Windows"& Chr(34) & ">")
  Select Case iMainTeller  ' personal folder , volgende descriopt is public folder
      Case 1 : objTextFile.WriteLine(vbTab & vbTab & vbTab & "<description>@shell32.dll,-34577</description>")
      Case 2 : objTextFile.WriteLine(vbTab & vbTab & vbTab & "<description>@shell32.dll,-34622</description>")
     ' Case 3 : objTextFile.WriteLine(vbTab & vbTab & vbTab & "<description>@shell32.dll,-34586</description>")
      Case 4 : objTextFile.WriteLine(vbTab & vbTab & vbTab & "<description>@shell32.dll,-34597</description>")
     End Select          
  objTextFile.WriteLine(vbTab & vbTab & vbTab & "<isDefaultSaveLocation>true</isDefaultSaveLocation>")
  objTextFile.WriteLine(vbTab & vbTab & vbTab & "<simpleLocation>")
  'Know folders GUID : http://msdn.microsoft.com/en-us/library/bb882665.aspx
  Select Case iMainTeller
   Case 1 : objTextFile.WriteLine(vbTab & vbTab & vbTab & vbTab & "<url>knownfolder:{FDD39AD0-238F-46AF-ADB4-6C85480369C7}</url>")
   Case 2 : objTextFile.WriteLine(vbTab & vbTab & vbTab & vbTab & "<url>knownfolder:{18989B1D-99B5-455B-841C-AB7C74E4DDFC}</url>")
  ' Case 3 : objTextFile.WriteLine(vbTab & vbTab & vbTab & vbTab & "<url>knownfolder:{4BD8D571-6D19-48D3-BE97-422220080E43}</url>")
   Case 4 : objTextFile.WriteLine(vbTab & vbTab & vbTab & vbTab & "<url>knownfolder:{33E28130-4E1E-4676-835A-98395C3BC3BB}</url>")
  End Select 
  'serialized will be created by Windows when first accessed  http://msdn.microsoft.com/en-us/library/windows/desktop/dd940482(v=vs.85).aspx
 
  objTextFile.WriteLine(vbTab & vbTab & vbTab & "</simpleLocation>")
  objTextFile.WriteLine(vbTab & vbTab & "</searchConnectorDescription>")
  objTextFile.WriteLine(vbTab & vbTab & "<searchConnectorDescription publisher="& Chr(34) & "Microsoft"& Chr(34) & " product="& Chr(34) & "Windows"& Chr(34) & ">")
  Select Case iMainTeller
      Case 1 : objTextFile.WriteLine(vbTab & vbTab & vbTab & "<description>@shell32.dll,-34579</description>")
   Case 2 : objTextFile.WriteLine(vbTab & vbTab & vbTab & "<description>@shell32.dll,-34624</description>")
     ' Case 3 : objTextFile.WriteLine(vbTab & vbTab & vbTab & "<description>@shell32.dll,-34588</description>")
      Case 4 : objTextFile.WriteLine(vbTab & vbTab & vbTab & "<description>@shell32.dll,-34599</description>")
     End Select 
  objTextFile.WriteLine(vbTab & vbTab & vbTab & "<isDefaultNonOwnerSaveLocation>true</isDefaultNonOwnerSaveLocation>")
  objTextFile.WriteLine(vbTab & vbTab & vbTab & "<simpleLocation>")
  'Know folders GUID : http://msdn.microsoft.com/en-us/library/bb882665.aspx
  Select Case iMainTeller
   Case 1 : objTextFile.WriteLine(vbTab & vbTab & vbTab & vbTab & "<url>knownfolder:{ED4824AF-DCE4-45A8-81E2-FC7965083634}</url>")
   Case 2 : objTextFile.WriteLine(vbTab & vbTab & vbTab & vbTab & "<url>knownfolder:{2400183A-6185-49FB-A2D8-4A392A602BA3}</url>")
  ' Case 3 : objTextFile.WriteLine(vbTab & vbTab & vbTab & vbTab & "<url>knownfolder:{3214FAB5-9757-4298-BB61-92A9DEAA44FF}</url>")
   Case 4 : objTextFile.WriteLine(vbTab & vbTab & vbTab & vbTab & "<url>knownfolder:{B6EBFB86-6907-413C-9AF7-4FC2ABF07CC5}</url>")
  End Select 
  'serialized will be created by Windows when first accessed  http://msdn.microsoft.com/en-us/library/windows/desktop/dd940482(v=vs.85).aspx
  objTextFile.WriteLine(vbTab & vbTab & vbTab & "</simpleLocation>")
  objTextFile.WriteLine(vbTab & vbTab & "</searchConnectorDescription>")
  objTextFile.WriteLine(vbTab & "</searchConnectorDescriptionList>")
  objTextFile.WriteLine("</libraryDescription>")
  objTextFile.Close
  End If
    End If
Next
   
Set objTextFile = Nothing
Set objFSO = Nothing


Hopefully, even if you find yourself in a situation where you see some odd behaviour from using the "Disable Known Folders" GPO, this bit of VB should allow you to restore the folders that you require into the user's environment.

Disabling the Internet Explorer "Automatically detect settings" checkbox using AppSense DesktopNow

$
0
0
I worked at a client recently where the presence of a check in the "Automatically detect settings" box in the Connections | LAN Settings part of Internet Explorer Options appeared to cause no end of problems. Long delays loading websites and poor logon performance of published applications were the primary issues observed. There's probably some network-based reason behind this, but given that when the box was unchecked everything worked fine (because we'd deployed all the proxy server settings and the like through Environment Manager), the obvious answer seemed to find some way to uncheck the box for all users, and everything would be fine.

However, getting the check out of the darned box didn't seem to be as easy as we first anticipated.

The check box of evil

Most of you are probably sitting there and thinking "easy, just use the Group Policy Internet Explorer Maintenance options". That's a good point - but deploying Internet Explorer settings through the mechanisms available in Group Policy soon becomes murky.

You've got three distinct sets of settings. Those in Internet Explorer Maintenance (which incidentally have been deprecated from Server 2012/IE 10 onwards anyway), those in Windows Components | Internet Explorer, and those in Preferences | Control Panel | Internet Settings. Unfortunately, all three of these have different sets of available options, and some of them interact differently - some overwrite, some merge, some do both. It soon becomes a nightmare to maintain, particularly if you've got multiple browser versions.

My normal stance on this is to transfer as much as possible into AppSense Environment Manager by deploying the Registry settings directly. I'm going to do an article with a sample configuration soon, because you have to use Registry Actions directly for a lot of the stuff you used to see in Internet Explorer Maintenance, as there is no ADM/ADMX support.

For the problem in question, though, there appeared to be no easy way to deploy this option so it was unchecked by default. Group Policy Preferences don't allow it to be deployed through Internet Options. Internet Explorer Maintenance was unworkable due to the way it interacted with other settings, and as mentioned earlier, is slated for removal anyway. The base Internet Explorer GPOs in Windows Components | Internet Explorer don't seem to have a setting for manipulating this either. It might have been an option to set the default profile up with the box unchecked and then let users build their settings from there, but that seemed unsatisfactory given that a lot of users were already using the new environment. Besides, if the setting ever needed to be changed back, we would be back to square one again.

Hunting the Internet for Registry settings that controlled this seemed to be the only option. Eventually, we discovered a setting in HKCU\Software\Microsoft\Windows\CurrentVersion\Internet Settings\Connections called DefaultConnectionSettings that seemed to control this.


However, the value is a REG_BINARY, which straight away complicates matters. Manipulating binary values with either regedit.exe from the command line, AppSense EM Registry Actions or even Group Policy Preferences can be tricky, especially when it turns out - as in this case - that we need to change one particular bit of the binary value in order to uncheck the setting. As usual, there's only one surefire way to do this without taking the risk of wiping out the whole value - a touch of scripted goodness.

I was looking to do this in PowerShell, but I managed to find a VBScript that did the job nicely - handy that Environment Manager supports both equally well! As in my last post, I must apologize to the author of the script for not remembering where I pulled this from - feel free to get in touch and I will credit you for it.

Let's look at our test user before we put the script in place. We've configured a proxy server, proxy port and various other browser settings through Registry Actions in Environment Manager, so we want to make sure that we leave these settings intact.


Next we will add the script to Environment Manager. Interestingly, I've started putting Internet Explorer settings into the Logon trigger rather than the Process Started one recently, because I'm coming across more and more applications that interact with Internet Explorer settings (such as the proxy server and port). Of course, this makes Personalization a tad trickier too - but this is something to be discussed in a different article, probably the one I alluded to earlier about IE settings.

Set up a Custom Action, set the scripting type to VBScript, and insert the following code

Option Explicit
On Error Resume Next
'Create a constant for the HKEY_CURRENT_USER object
Const HKCU = &H80000001
'Define variables
Dim strComputer
Dim strRegistryKey
Dim objRegistry
Dim strRegistryValue
Dim binValue
strComputer = "."
strRegistryKey = "Software\Microsoft\Windows\CurrentVersion\Internet Settings\Connections"
strRegistryValue = "DefaultConnectionSettings"
'Connect to the Registry
Set objRegistry = GetObject("winmgmts:\\"& strComputer & "\root\default:StdRegProv")
'Retrieve the current settings.
objRegistry.GetBinaryValue HKCU, strRegistryKey, strRegistryValue, binValue
'Change the 'Automatically detect settings' box to unticked
binValue(8) = 03
'binValue(8) = 13 - Enable this line to check the box instead of uncheck
'Save the changes

objRegistry.SetBinaryValue HKCU, strRegistryKey, strRegistryValue, binValue


There is, rather helpfully, a commented-out line you can use should you want to check the box again, for whatever reason.

To stop users from being able to change the setting once you've unchecked it, also set the following Registry value


So now your configuration items should look like this


Now we need to save the configuration into the Management Center and deploy it out. Once it has deployed out, let's log on and see what our settings look like now!

Of course, as we expected, they look exactly as we want them to :-)


The box is unchecked, our proxy server settings are intact - and best of all, the user can't mess with the settings that were giving us such a problem!

As I mentioned previously, there's probably an underlying issue which is the reason why the "Automatically detect settings" option caused such a problem. But if turning it off made those problems go away, and didn't cause any other adverse effects, then it stands to reason that disabling it is a good thing. This does, however, bring us to the mish-mash of settings that Microsoft provide us with to manage the Internet Explorer browser, and it is high time I did an article with a sample configuration that shows AppSense admins how to manage it more quickly and easily. That is a subject I will hopefully visit over the next few weeks.
Viewing all 178 articles
Browse latest View live